These tutorials show you how to build some of the components
we use on our rockets. While it may not always be possible to
reproduce these components exactly, many of the designs can be
customized based on the materials you have available.
For a full list of all construction tutorials go to the
Construction Index.
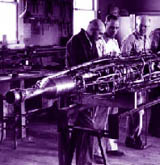
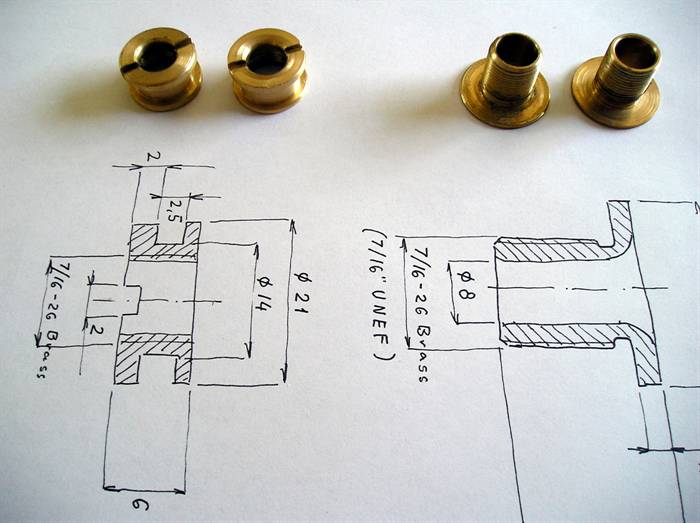
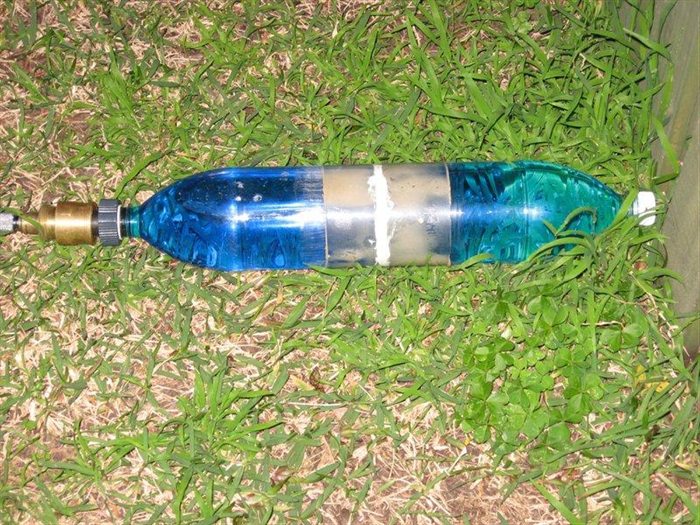
Robinson Coupling
Robinson couplings.
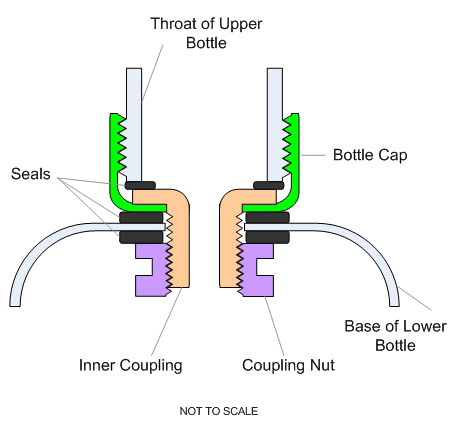
Diagram of how the coupling fits together.
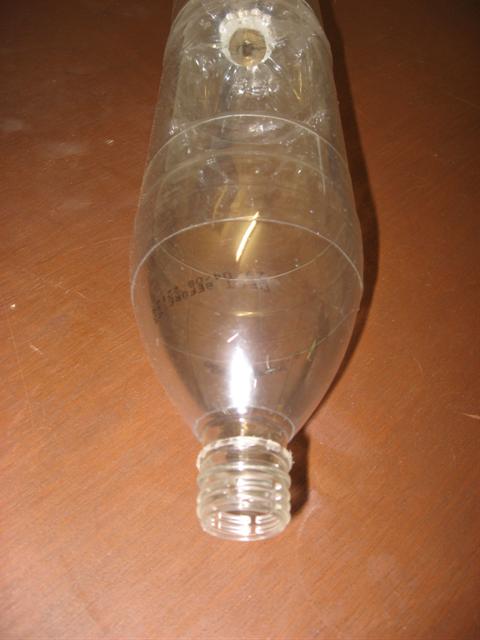
A Robinson coupling typically consists of a hollow threaded
tube that joins two bottles together allowing air or water under
pressure to pass from one to the other. This increases the
volume of the pressure vessel. Often a number of bottles can be
cascaded this way to gain even more volume.
Robinson couplings can be used to join bottles neck to neck,
base to neck or base to base depending on the rocket design.
The main advantages of Robinson couplings are that they
relatively easy to make and are reusable. The main disadvantage
is that they typically only have a small hole and hence restrict
the internal flow somewhat. Robinson couplings are best used
with restricted nozzles.
We present the construction and assembly of the Robinson
couplings we use as a video tutorial.
My recommendation is to replace the O-rings in
the above description with hard rubber washers as they will get
a better seal and will not deform the same way o-rings will.
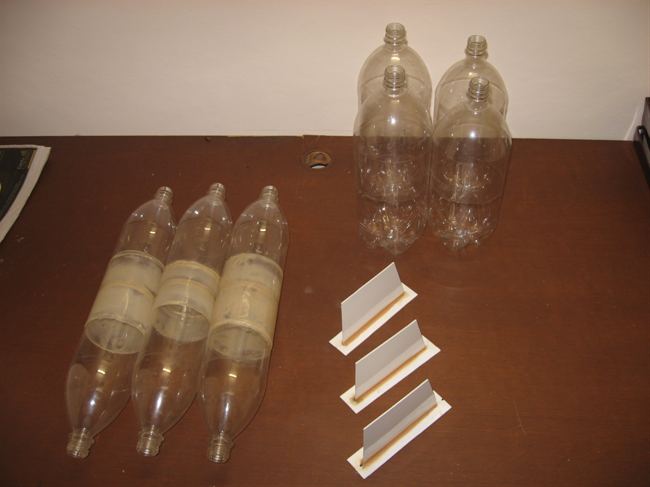
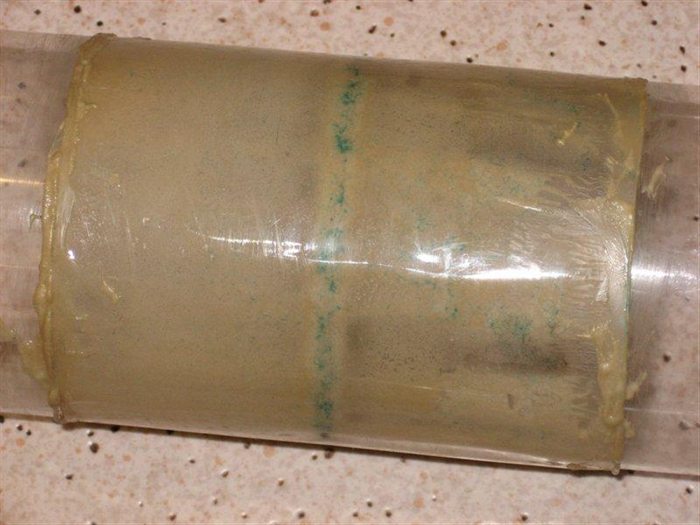
Spliced Pairs of bottles shown on left. The
video tutorial explains how to make these.
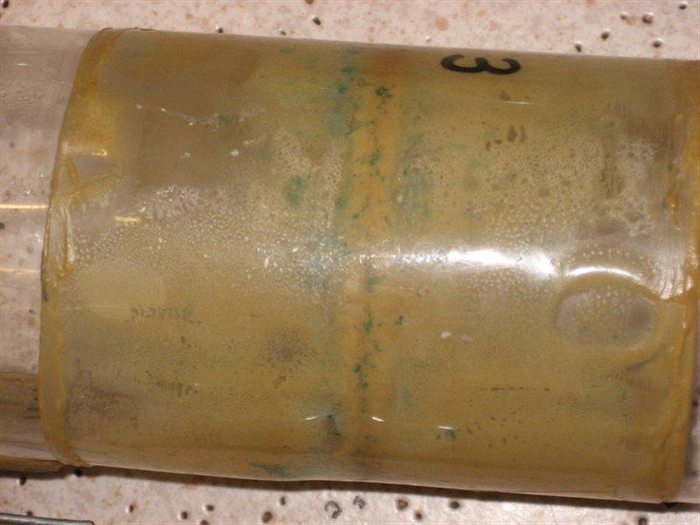
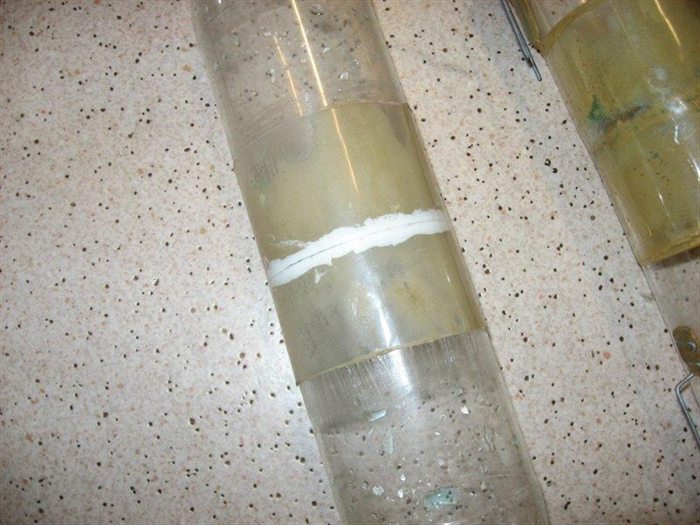
Splicing Tip #1 Photos
Example #1 showing where the food colouring
has penetrated all the way through the splice to
the edge.
Another older splice repeatedly filled.
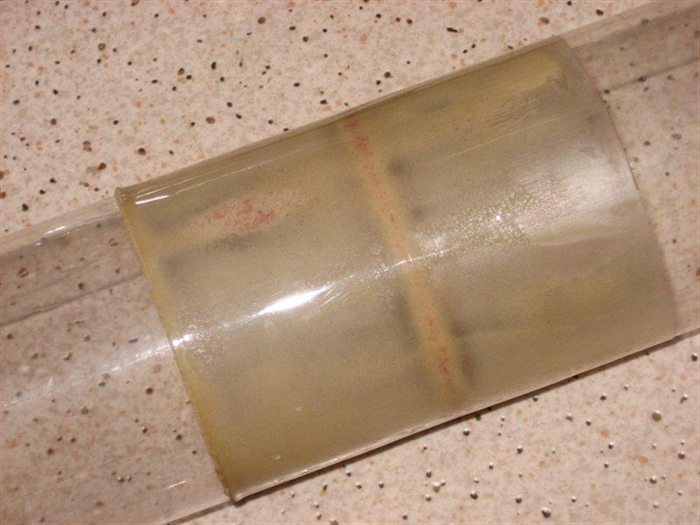
New splice with red food colouring. You can
see where it entered the little void on the
left.
Sikaflex sealed splice undergoing pressure
test.
Sealed splice shows no penetration of food
colouring.
Splicing bottles together is another technique often employed
by water rocketeers to increase the volume of their rockets.
Splicing involves gluing sections of bottles together to make a
longer pressure vessel.
Because of the forces involved inside a typical rocket, and
because PET plastic is very hard to glue, there are only a few
existing glues that are suitable for the job. The most commonly
used is PL Premium construction adhesive, but VISE and a small number
of others can also be used.
Splicing is not as easy as joining bottles using a Robinson
coupling, is permanent and is less predictable
at which pressure it will fail, but it has the advantages of
virtually unrestricted internal flow and potentially long
pressure bodies can be made this way.
The technique presented here is based on previous work done
by other rocketeers:
In the following video tutorial we present a technique called
'symmetrical splicing' for joining two bottles. The same
technique can be used for making much longer bodies. The join is
just repeated for each section.
(If the video does not play, try the latest
Flash player from Macromedia)
Ever since we started using food colouring in our rockets we
have noticed that bottles spliced with PL premium can leak ever
so slightly. We didn't notice this leakage before with just
clear water. It appears that PL can be quite porous.
The photos on the left show examples where the food colouring
has penetrated the splice. We have noticed this with pretty much
all of the spliced pairs of bottles we have made. Some do it
more than others.
The bottles seem to hold the pressure, but if you have a
rocket body with lots of splices then the leakage can add up. If
you hold the rocket pressurised on the pad for an extended
period, the pressure inside it can drop. There is also some risk
in pressurised air entering the splice walls and then with a
sudden release of pressure during launch the air may not have
enough time to escape through the tiny holes and potentially
cause the splice to delaminate.
To stop the leakage with this kind of splice:
Mark a line on the inside of splice where the two
bottles will meet.
Run a healthy bead of
Sikaflex glue along the line on the inside of the
sleeve. Sikaflex does not bubble during the curing process.
Use PL premium on the rest of the splice as normal, but
don't put any PL on the curled edges of the bottles.
When you bring the splice together the Sikaflex fills
the little gap between the curled edges and the sleeve and
also squeezes a little bit inside the bottles. This provides
an air and water tight seal, but with the strength of the PL
holding the splice together.
We've tested the splice under pressure using coloured water
and there was no visible leakage. If you can't get Sikaflex you
can probably find other equivalent non-porous flexible glue or
sealant. These don't need to have the strength of PL. Sikaflex
is a pretty good glue in itself for holding on to PET so I would
recommend it. If you are doing all Sikaflex splices then you can
disregard this technique.
Splicing Tip #2 - Clean Splice
Edges
Splicing bottles can be very messy and you can end up with
unsightly edges. An easy way to clean up the excess glue is to
do this:
Wrap one piece of masking or electrical tape all the way
around the edge of the outside of the sleeve.
Slide the sleeve onto the bottle you will be gluing it
to and position it in its final place.
Wrap another piece of tape around the bottle so that it
sits right up against the sleeve.
Do this to both ends of the sleeve and both bottles.
Splice as normal.
When the glue cures you can remove the tape for a clean
edge.
Note: you should probably leave the tape until the
glue cures as some may come out of the splice as it expands.
We use electrical tape as it is strong when removing it with
the hardened glue.
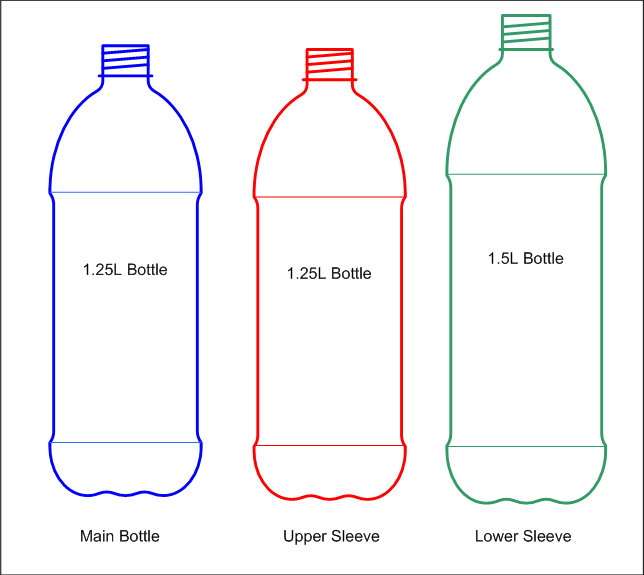
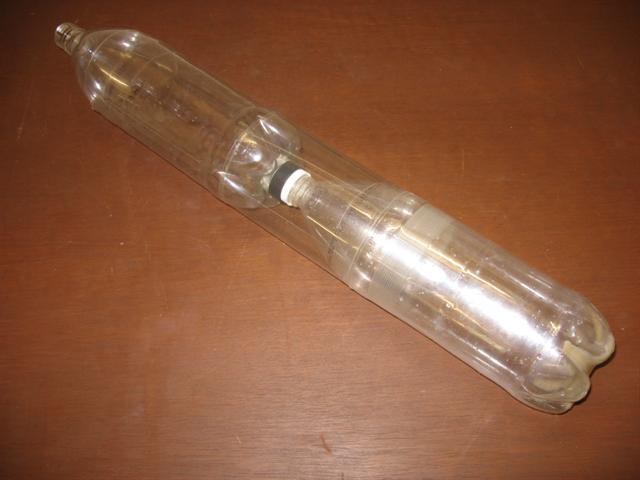
The three bottles required to make one
reinforced bottle.
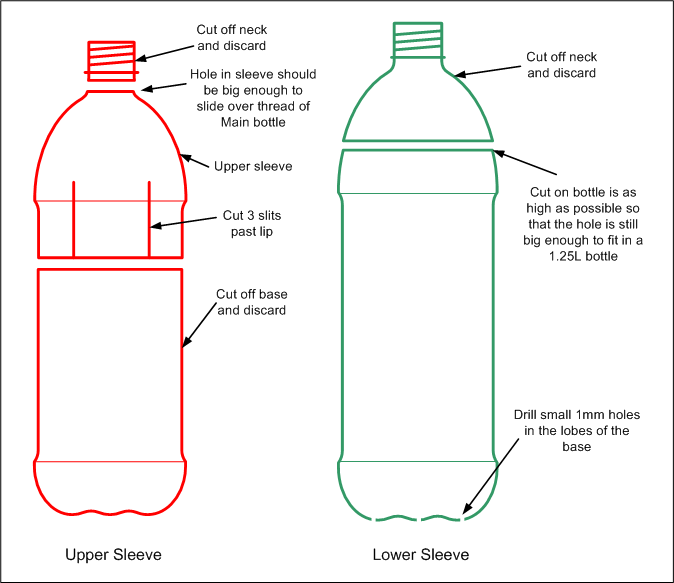
Creating the sleeves.
Fitting sleeves to main bottle
Heat shrinking
Robinson Coupled
The three bottles required to make one
reinforced bottle.
Creating the sleeves.
Fitting sleeves to main bottle
Heat shrinking
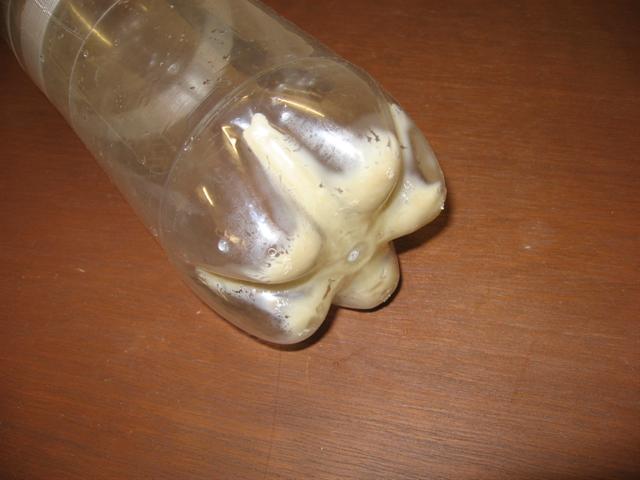
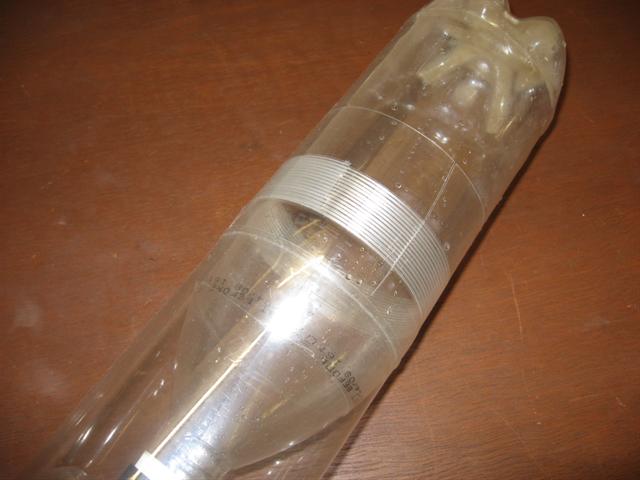
Reinforced bottles. This combination was
tested to 200psi with no leaks or visible stress
marks.
This view shows the upper bottle with PL
premium sandwiched between the main bottle and
outer sleeve.
This view shows the strapping tape used to
retain the upper sleeve.
A close up showing where the sleeves overlap
each other.
Bottle reinforcing is a technique often employed by water
rocketeers to allow them to safely increase the pressure inside
the rocket in order to gain more altitude. The procedures
outlined below are based on a technique described by Richard
Wayman here:
http://wrockets.trib-design.com/index.php?project=RICHARD&page=hp.
CAUTION: Because
reinforced bottles can hold significant pressure, all safety
procedures should be followed when testing or when launching
rockets based on these bottles at higher pressures. Always
inspect these bottles before every launch for signs of stress.
Reinforcing a single bottle
Materials
1 x 1.5L bottle with straight sides (P&N in Australia)
2 x 1.25L bottles with straight sides
PL Premium or equivalent glue.
Strapping tape (optional)
Procedure
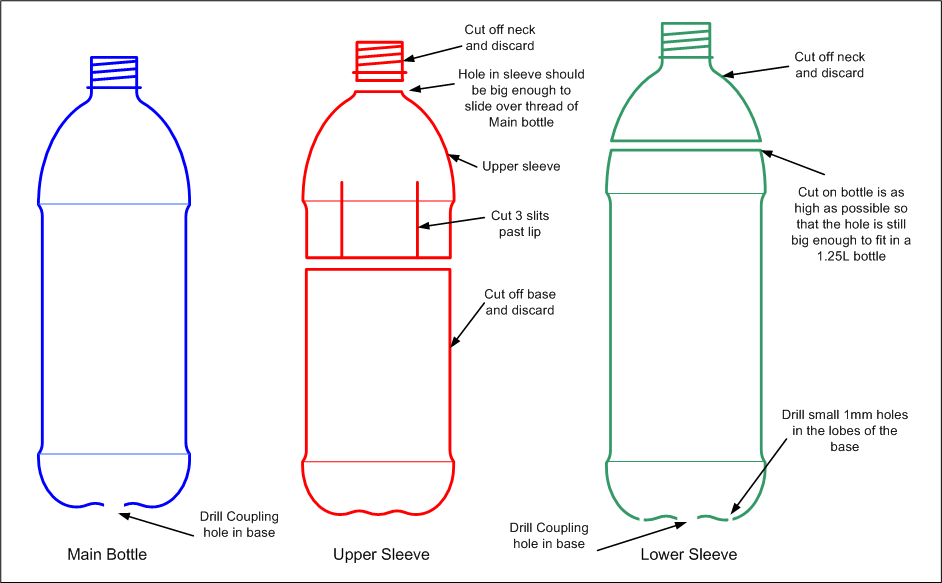
Remove the caps, cap retaining rings and labels from the
bottles.
Clean the glue from the bottles using mineral turpentine
and rinse then dry the bottles.
Cut the top off the 1.5L bottle so that the sleeve is as
long as possible so that the 1.25L bottle can slide in. This
is the lower sleeve. These 1.5L bottles have a diameter a
few mm bigger than the 1.25L bottles.
Make small 1mm holes in each of the lobes of the lower
sleeve. These allow air pressure to escape when the sleeve
is being shrunk.
To make the upper sleeve, cut the bottom off a 1.25L
bottle so that you end up with about 2-3cm past the top lip.
Now cut the neck off the upper sleeve so that the hole
is just big enough to fit over the thread of the main
bottle.
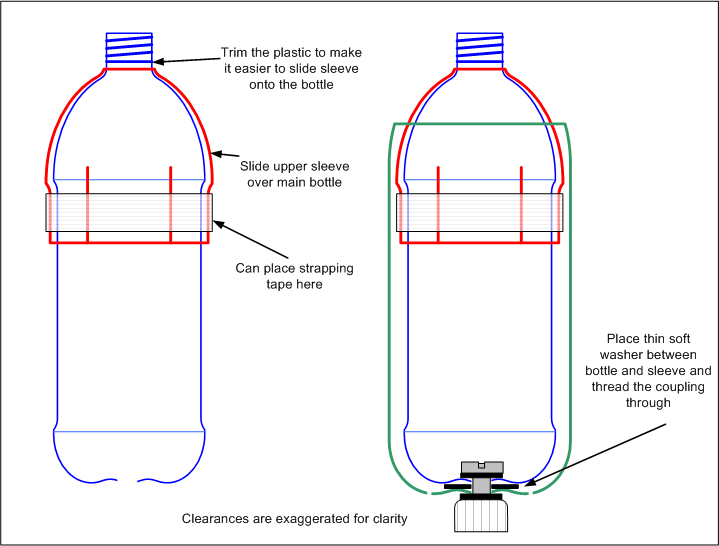
From the Main bottle trim the neck stop so that it is as
narrow as the thread. This makes it possible for the upper
sleeve to have as small a hole as possible. This is pretty
tough to trim with a Stanley knife, but we found that using
wire cutters is a lot easier to trim it away.
Now since the upper sleeve is the same size as the main
bottle you cannot fit it over the top. You need to cut at
least 3 slits to about 1cm past the sleeve's lip so that it
can stretch over the main bottle.
Now slide the upper sleeve over the main bottle. Once
past the main bottle lip the sleeve's lip will sit properly
around the main bottle. The slits will be slightly open
which is okay.
You can put some strapping tape just under the lip to
help hold the upper sleeve from sliding off under pressure.
This step may not be necessary as the lower sleeve will
overlap this section and hold it anyway.
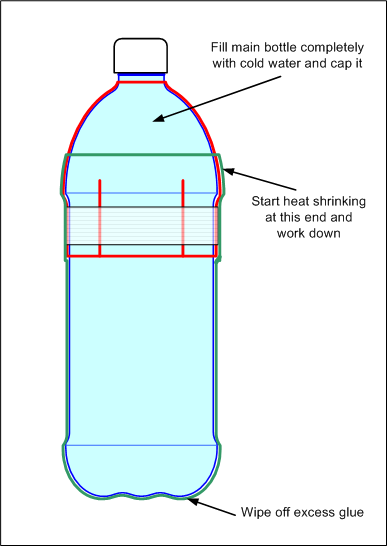
Now fill the the main bottle with cold water so that
there is no air inside it and cap it. Dry off the bottle
before proceeding to the next step.
Now put some glue on the base lobes of the Main bottle.
PL is good for this since it will not run and binds well to
PET. The glue helps prevent the lower sleeve from sliding
off the main bottle under pressure.
Slide the lower sleeve over the main bottle and push it
up against the base so that the glue fills the gaps in the
base. Wipe up the glue that leaks out of the holes.
Now we shrink the sleeves. There are a number of ways
you can achieve this for example using a heat gun, hot water
or as we prefer is doing it over a gas kitchen stove. Hot
water would be the last option as it is dangerous and also
tends to give less ideal results. It is always important to
continue to rotate the bottle over the heat source so that
you get an even rate of shrinking.
Start by shrinking the lower sleeve where it overlaps
the upper sleeve. This helps lock the lower sleeve in place
preventing it from sliding off as you shrink the rest of it.
Rotate the bottle and work your way towards the base. And
then return to the upper sleeve and shrink that. The upper
sleeve won't need much shrinking since it is a tight fit
already.
Make sure that the sleeves are shrunk as evenly as
possible and that the gap between the two bottles at the
base is either completely eliminated by shrinking or the
glue fills the gaps that cannot be shrunk. More glue will
come out of the holes in the lobes during the shrinking and
glue curing process, so wipe it off to prevent a mess.
Let the glue cure for a few days before pressure
testing.
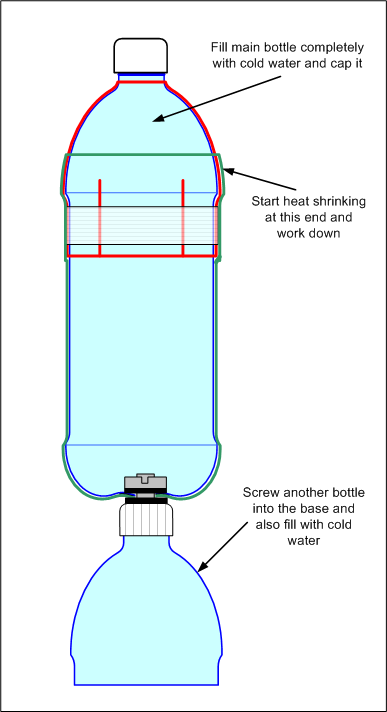
Reinforcing a bottle with a Robinson coupling in the base
Materials
1 x 1.5L bottle with straight sides (P&N in Australia)
2 x 1.25L bottles with straight sides
1 x Robinson coupling
1 x Thin soft washer with inner hole the size of the
coupling. PL premium (optional)
Procedure
Remove the caps, cap retaining rings and labels from the
bottles.
Clean the glue from the bottles using mineral turpentine
and rinse then dry the bottles.
Drill a hole for the coupling in the center of the base
of the main bottle. Remove all burrs and clean out any
shavings from the bottle.
Drill a hole for the coupling in the center of the base
of the 1.5L bottle. Remove all burrs and clean out any
shavings from the bottle.
Cut the top off the 1.5L bottle so that the sleeve is as
long as possible so that the 1.25L bottle can slide in. This
is the lower sleeve. These 1.5L bottles have a diameter a
few mm bigger than the 1.25L bottles.
Make small 1mm holes in each of the lobes of the lower
sleeve. These allow air pressure to escape when the sleeve
is being shrunk.
To make the upper sleeve, cut the bottom off a 1.25L
bottle so that you end up with about 2-3cm past the top lip.
Now cut the neck off the upper sleeve so that the hole
is just big enough to fit over the thread of the main
bottle.
From the Main bottle trim the neck stop so that it is as
narrow as the thread. This makes it possible for the upper
sleeve to have as small a hole as possible. This is pretty
tough to trim with a Stanley knife, but we found that using
wire cutters is a lot easier to trim it away.
Now since the upper sleeve is the same size as the main
bottle you cannot fit it over the top. You need to cut at
least 3 slits to about 1cm past the sleeve's lip so that it
can stretch over the main bottle.
Now slide the upper sleeve over the main bottle. Once
past the main bottle lip the sleeve's lip will sit properly
around the main bottle. The slits will be slightly open
which is okay.
You can put some strapping tape just under the lip to
help hold the upper sleeve from sliding off under pressure.
This step may not be necessary as the lower sleeve will
overlap this section and hold it anyway.
Invert the main bottle and place the thin soft rubber
washer over the hole.
Now slide the lower sleeve over the main bottle,
sandwiching the washer between the two bases.
Fit the Robinson coupling through the two bottles with
the appropriate washers inside and out (see video) and
tighten the coupling. The glue is not really necessary here
as the coupling holds the bases together. You can add the
glue if you wish to help fill the gap between the bases.
Screw in another bottle into the Robinson coupling and
fill the two bottles with cold water so there is no air left
in the bottle. Screwing in a small 600ml bottle makes it
easier to handle during the shrinking process. This bottle
is only temporary to hold the water in. Try not to get water
between the sleeves before shrinking.
Now we shrink the sleeves. There are a number of ways
you can achieve this for example using a heat gun, hot water
or as we prefer is doing it over a gas kitchen stove. Hot
water would be the last option as it is dangerous and also
tends to give less ideal results. It is always important to
continue to rotate the bottle over the heat source so that
you get an even rate of shrinking.
Start by shrinking the lower sleeve where it overlaps
the upper sleeve. This helps lock the lower sleeve in place
preventing it from sliding off as you shrink the rest of it.
Rotate the bottle and work your way towards the base. And
then return to the upper sleeve and shrink that. The upper
sleeve won't need much shrinking since it is a tight fit
already.
Make sure that the sleeves are shrunk as evenly as
possible and that the gap between the two bottles at the
base is either completely eliminated by shrinking or the
glue fills the gaps that cannot be shrunk.
If you used glue, then let the glue cure for a few days
before pressure testing.
NOTE: The Robinson couplings we use for these
reinforced bottles use a lid with a longer uninterrupted thread
compared to the standard bottle lid. We also have a reinforcing
ring over the top of that to prevent the cap from distorting
when tightened. .