Each flight log entry usually
represents a launch or test day, and describes the
events that took place.
Click on an image to view a larger image, and
click the
browser's BACK button to return back to the
page.
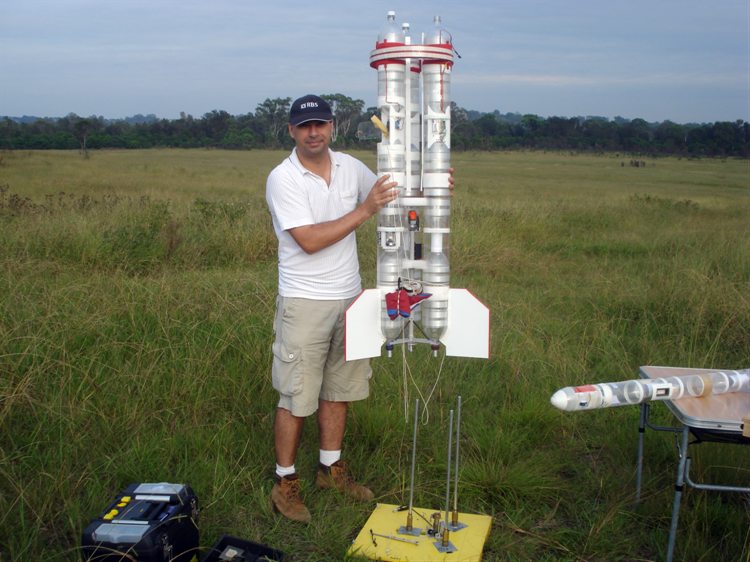
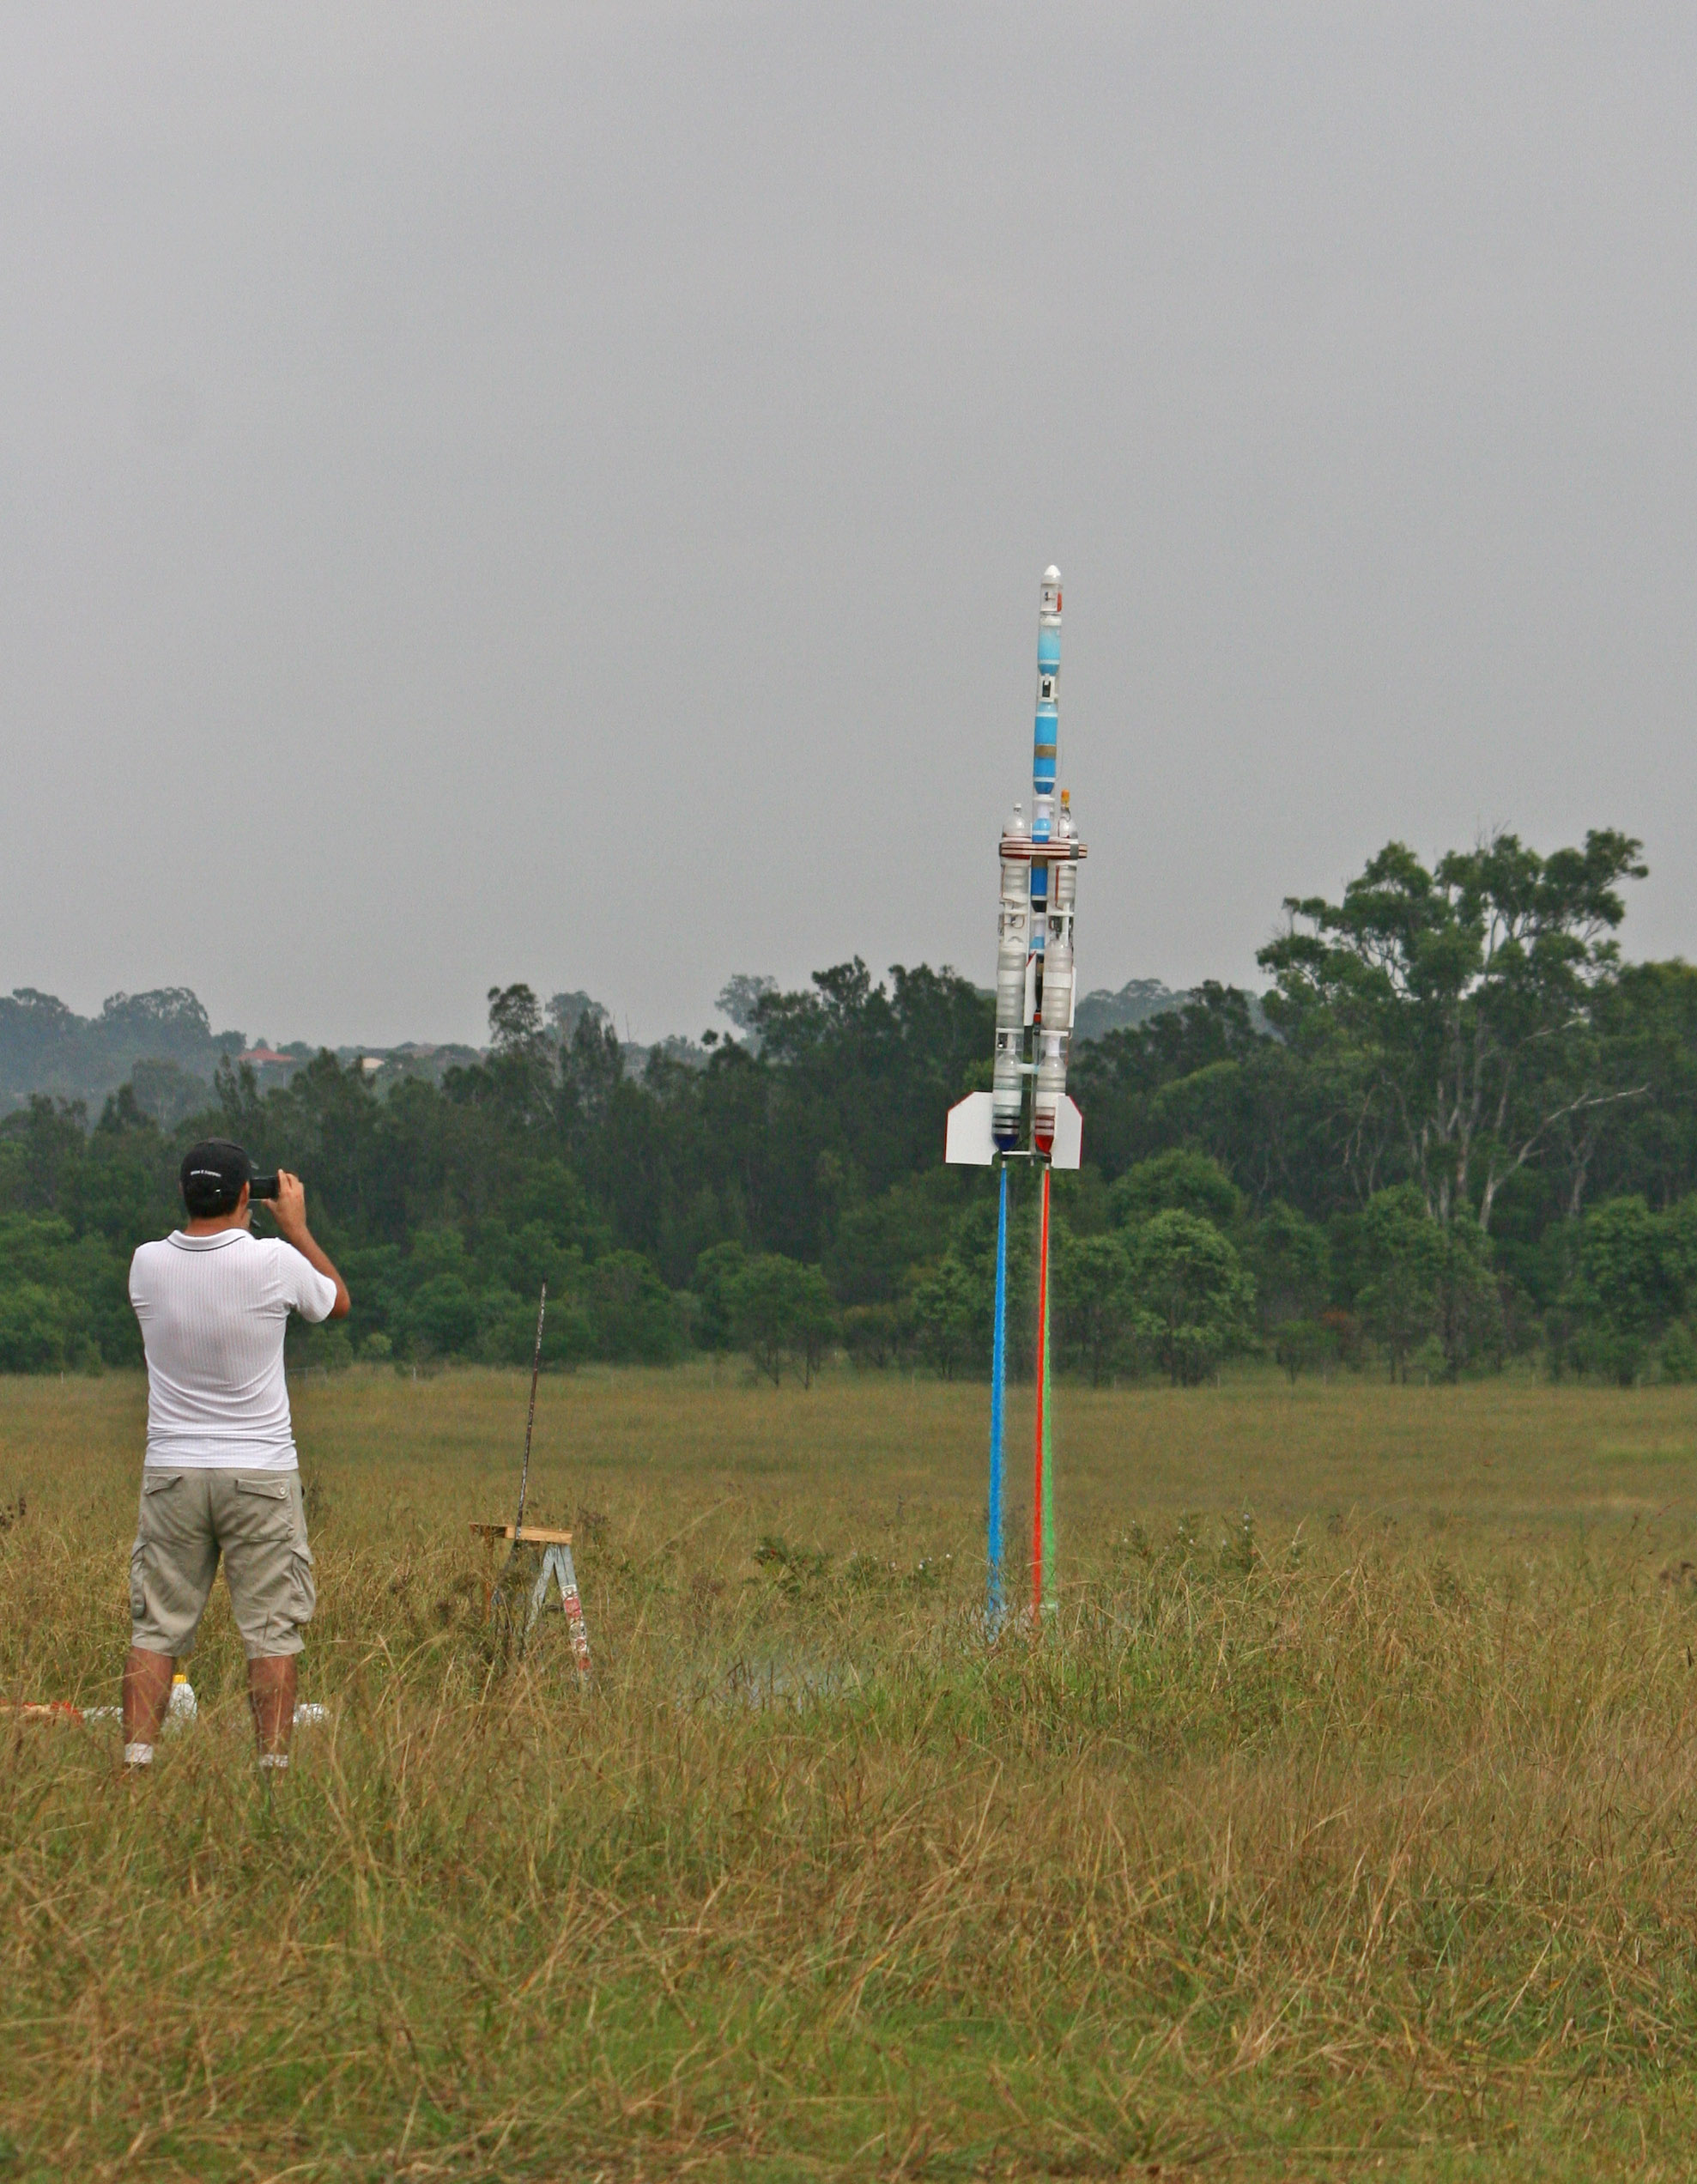
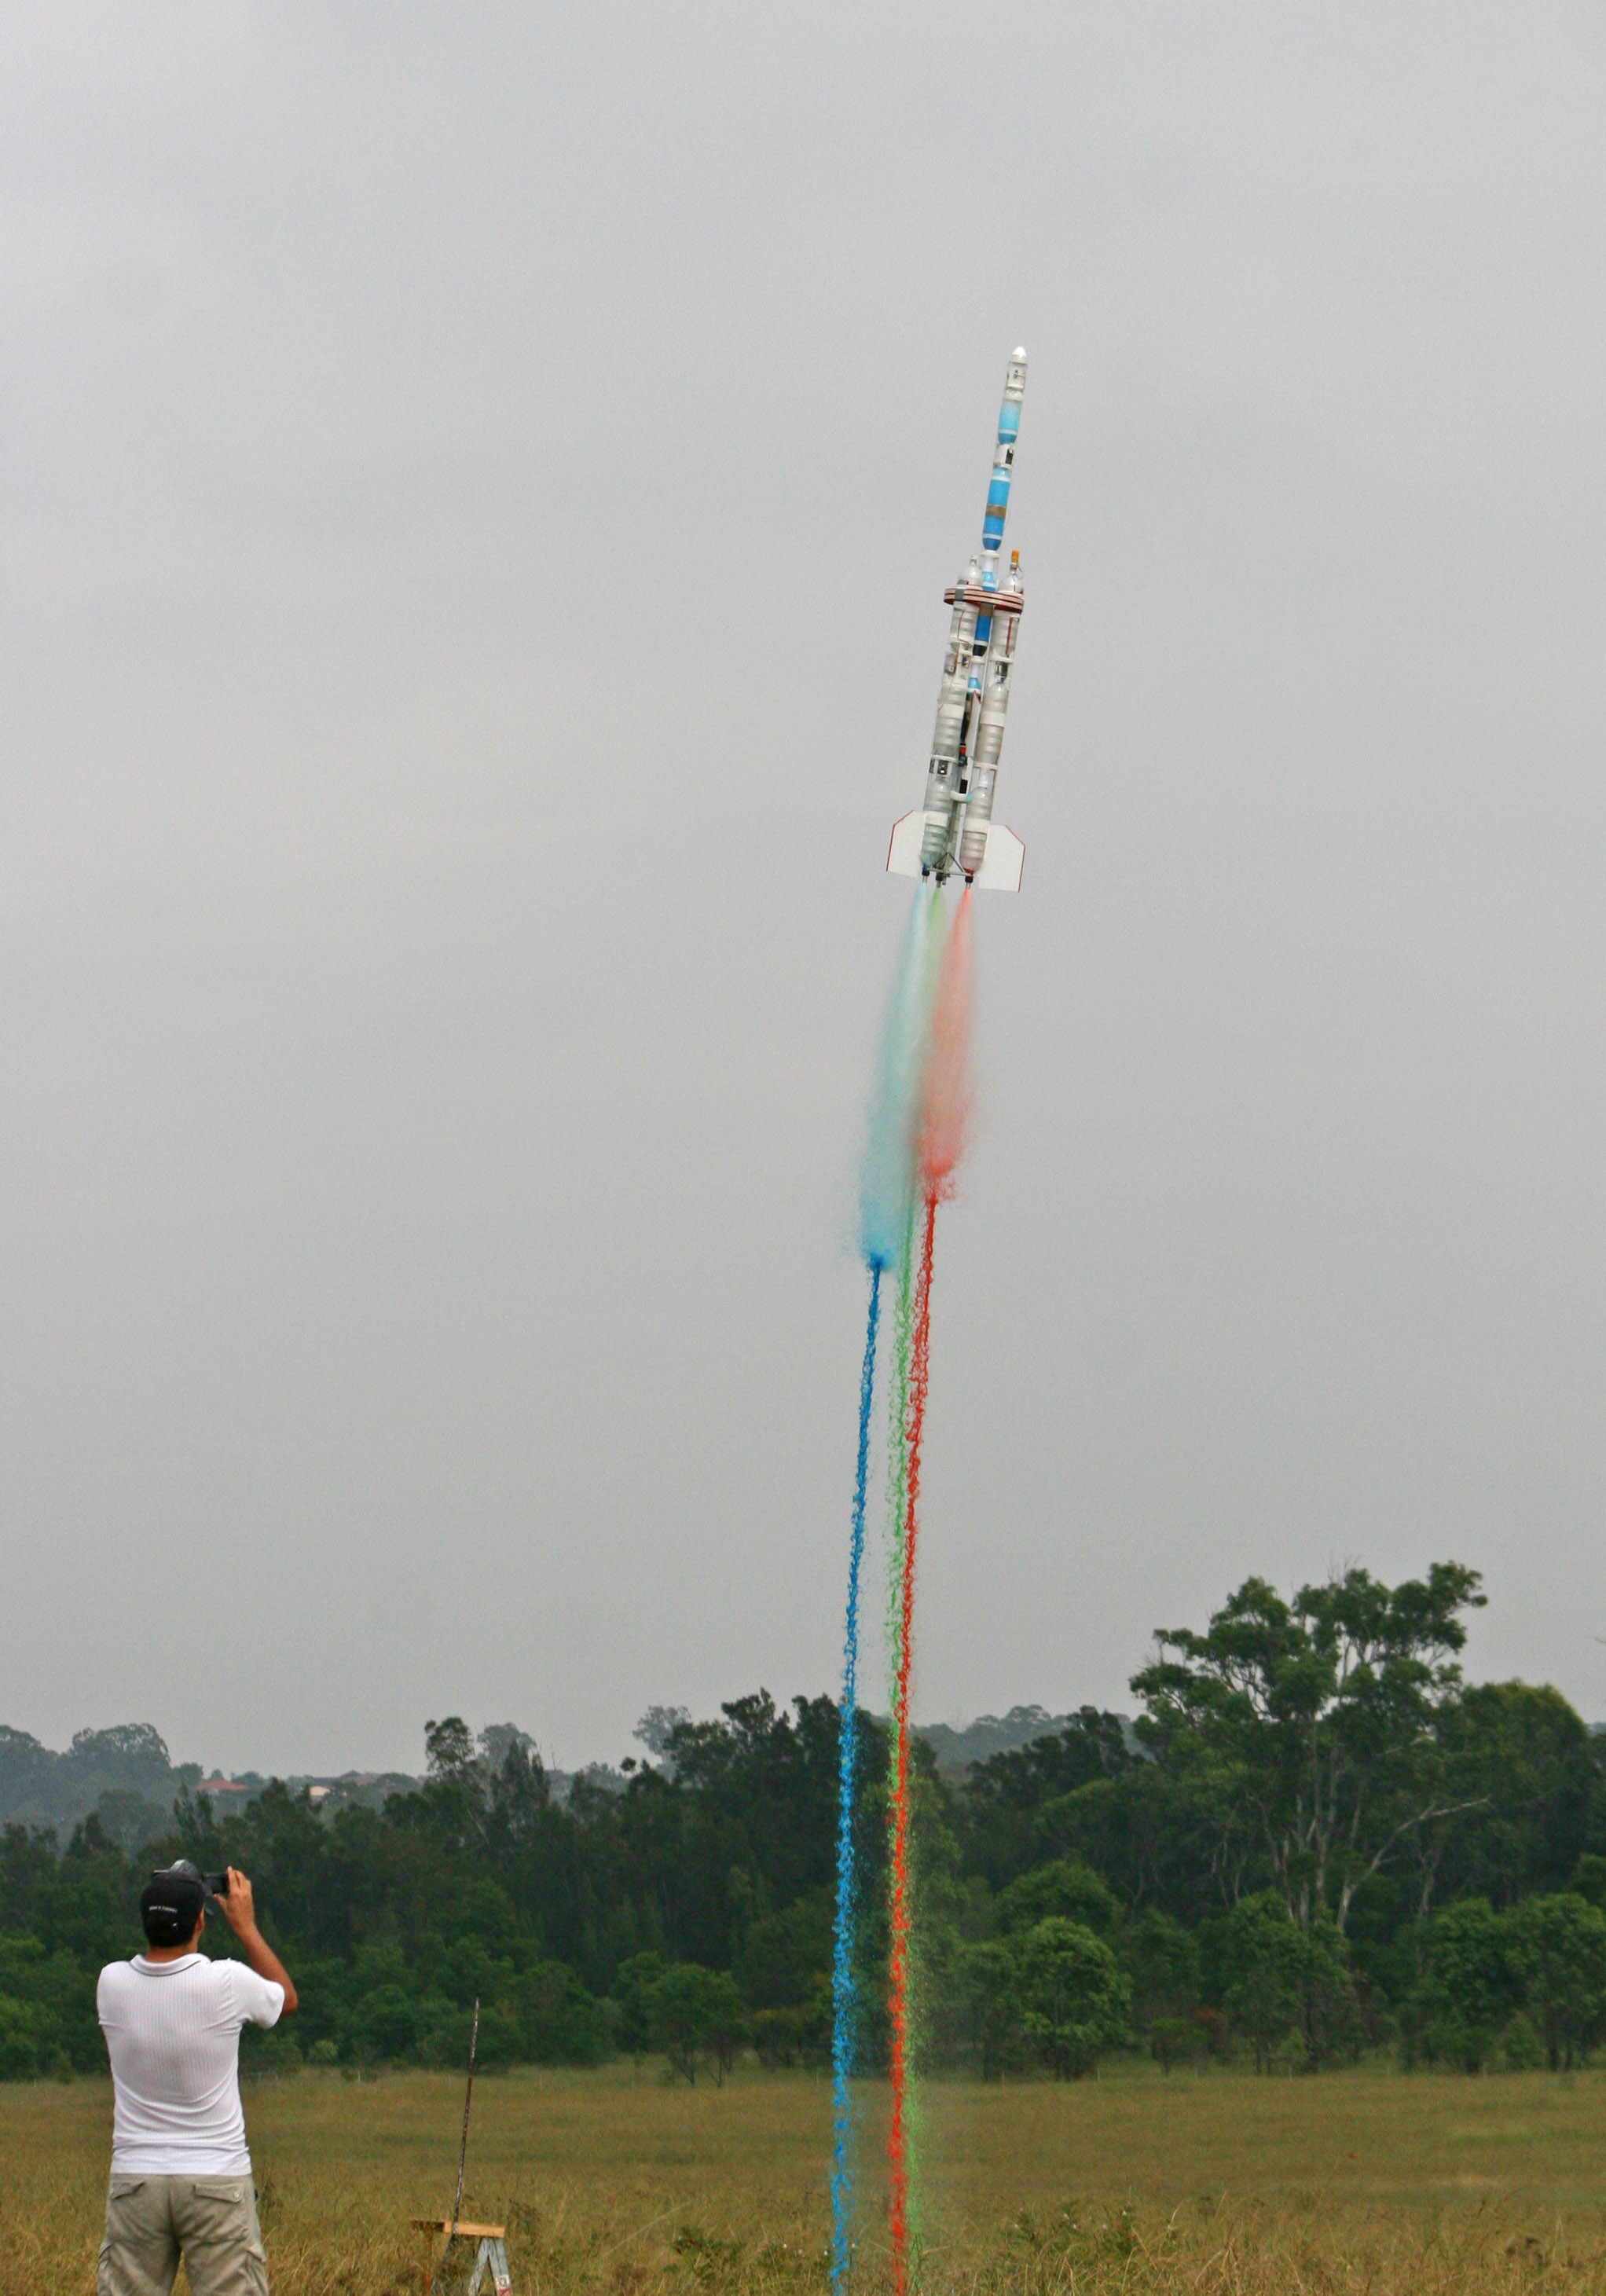
Day 90 - Acceleron V and Axion IVb flights to 787' and 810'
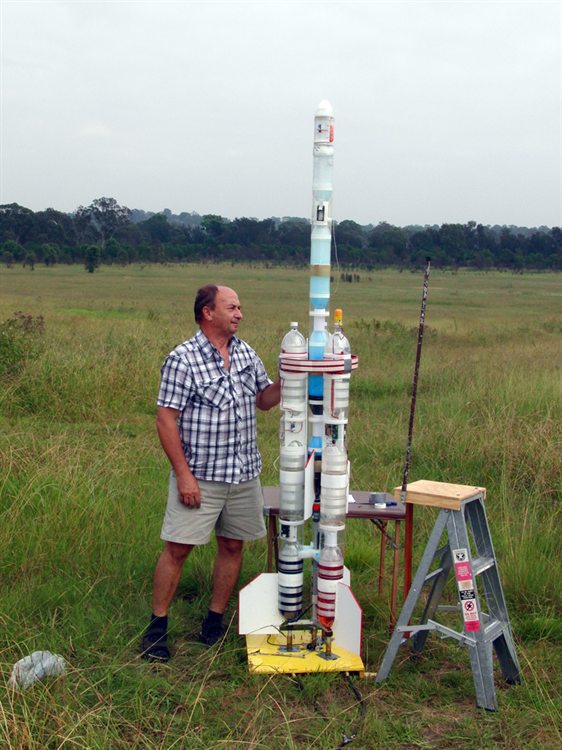
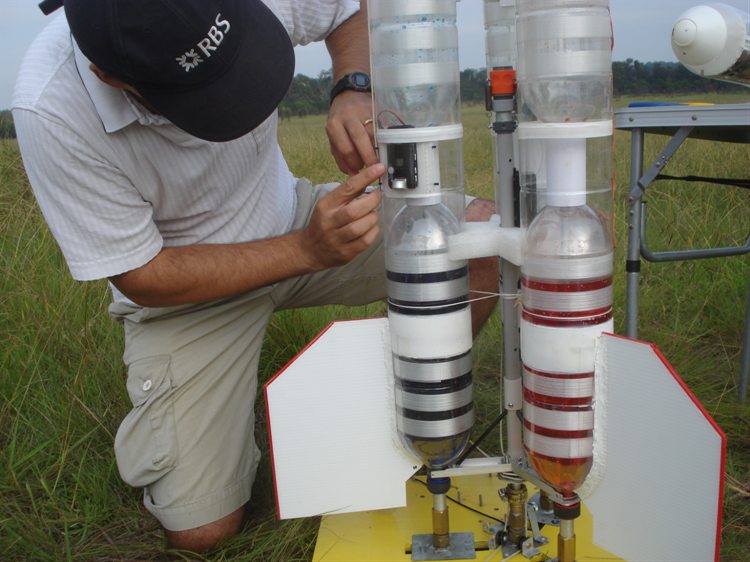
Working on Acceleron late into the night.
Loading the booster onto the launcher.
Each segment is filled with 2.5L of coloured
water
I write instructions on the rocket so I
don't forget to do things.
Checklists are always important ....
#1... read check list
....
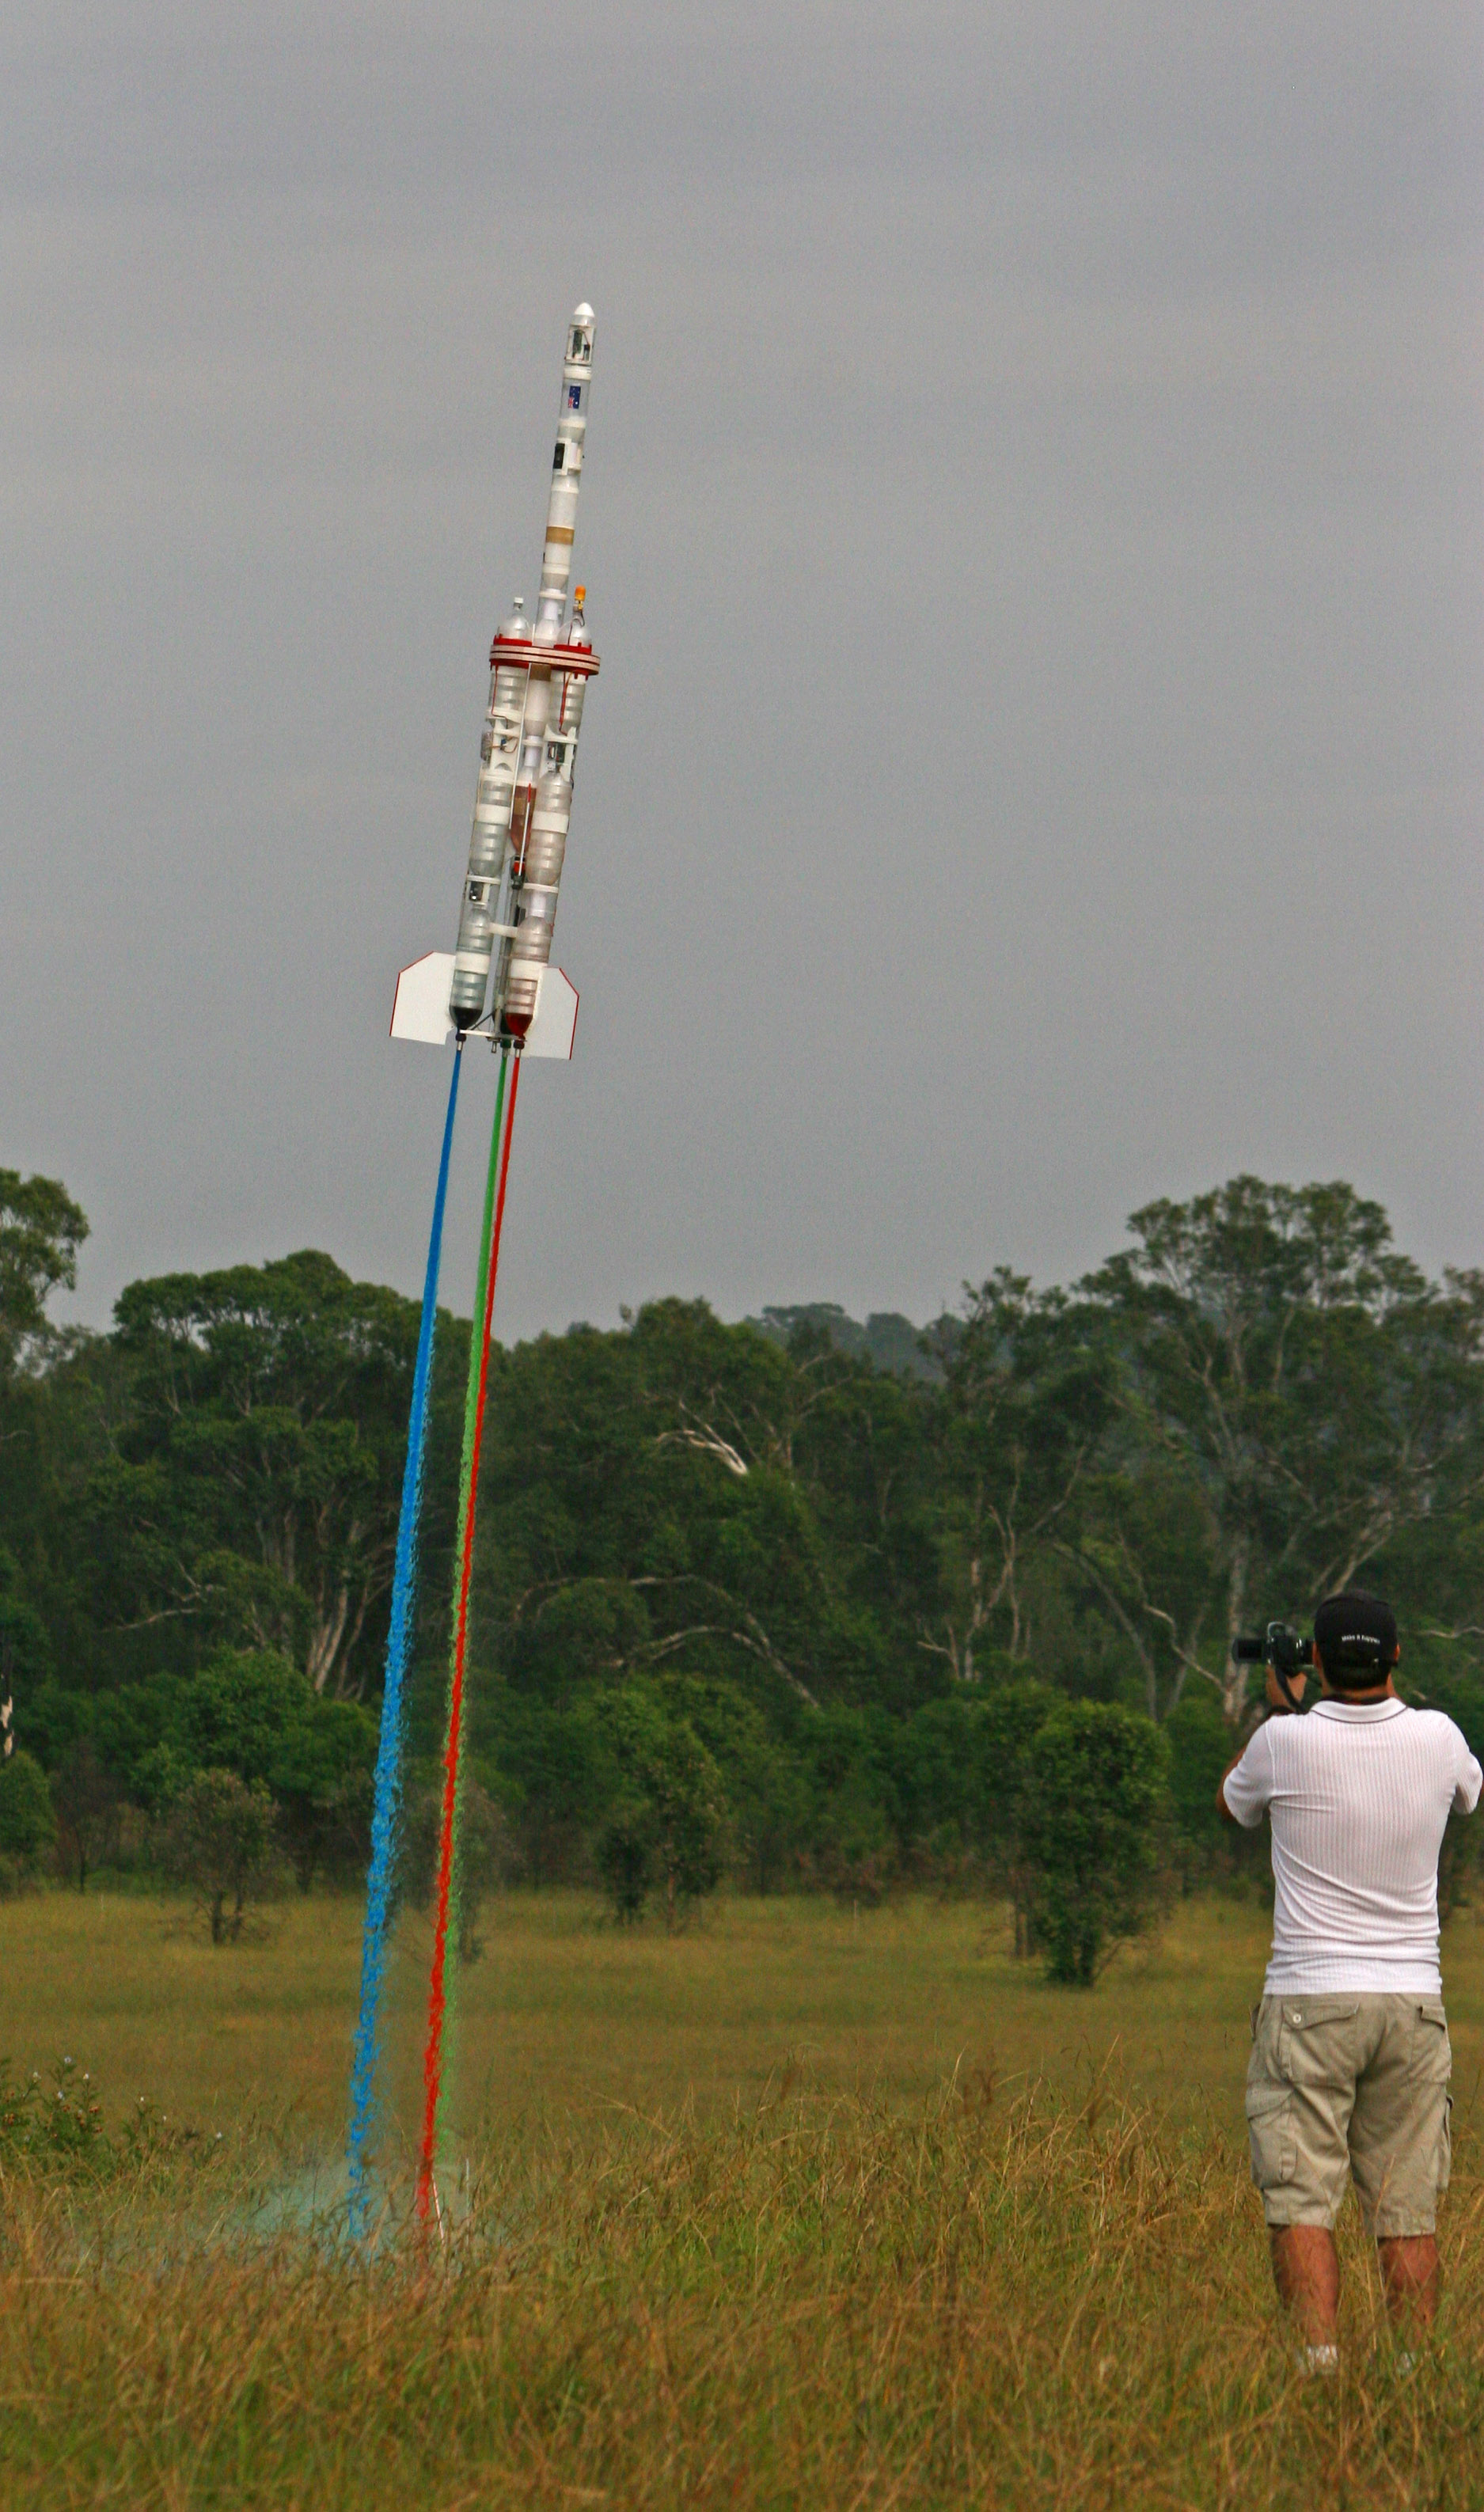
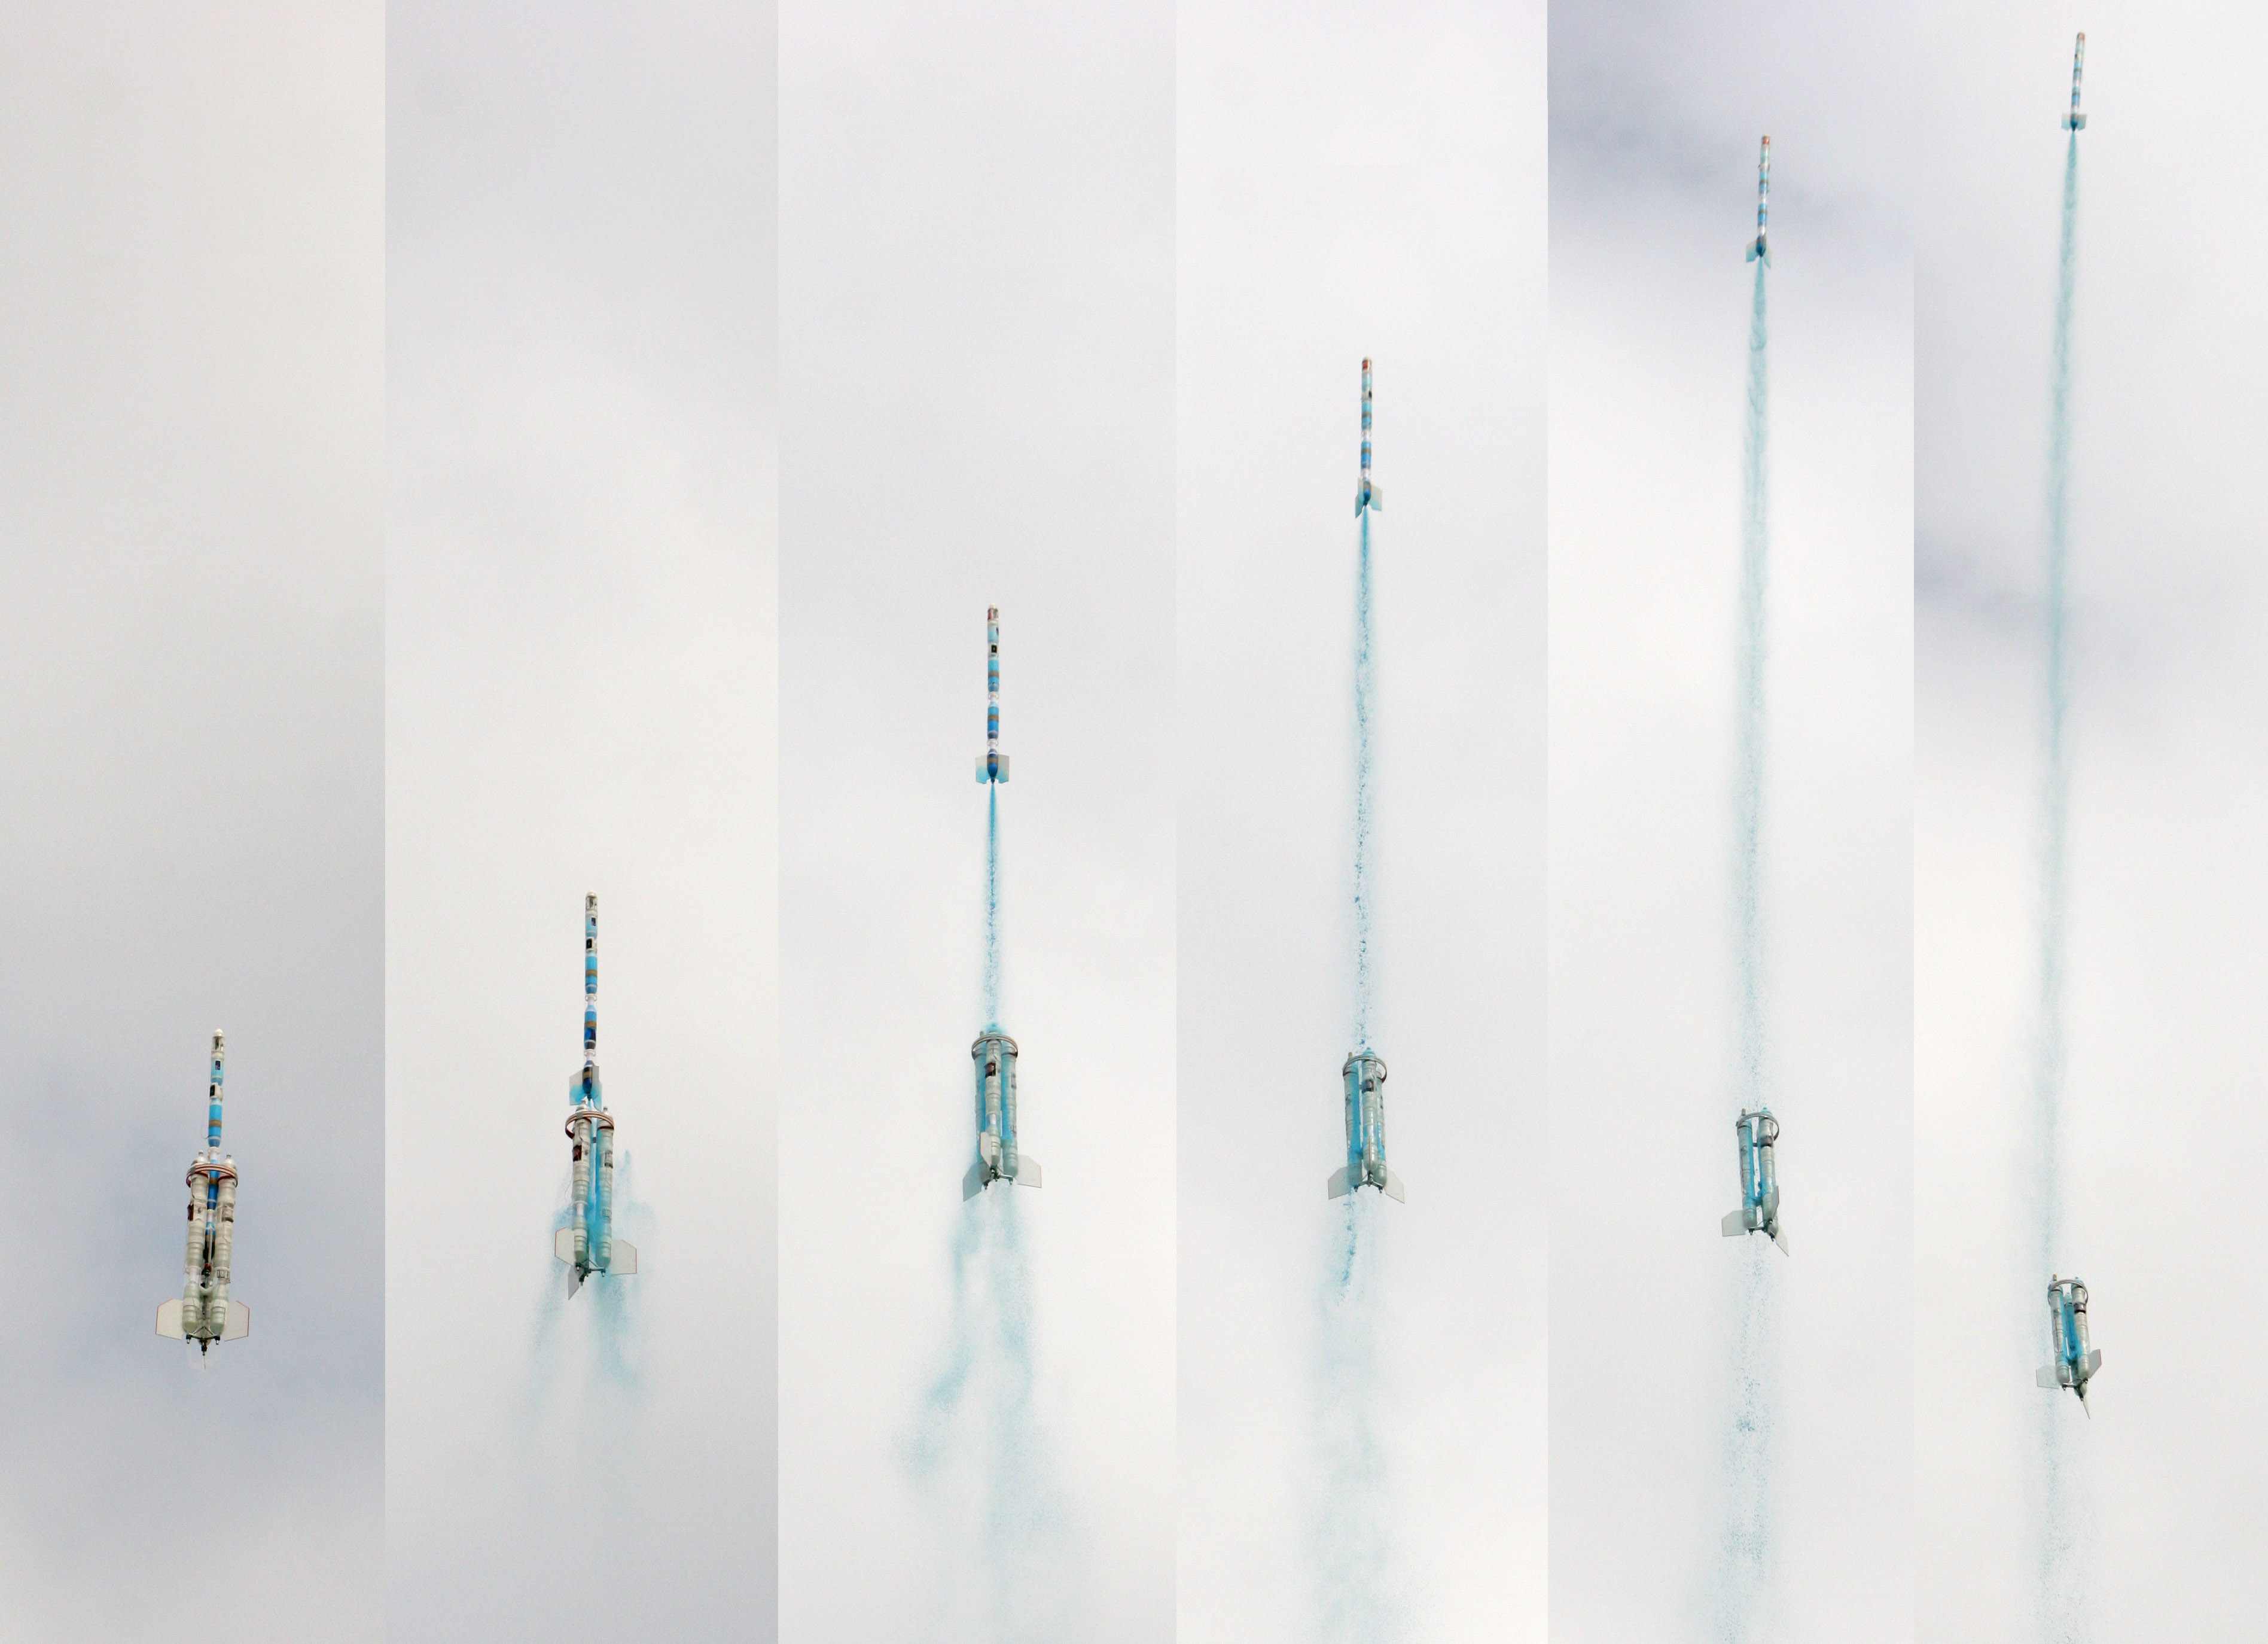
Acceleration is around 5-6G on launch.
Photo: A. Eltobaji
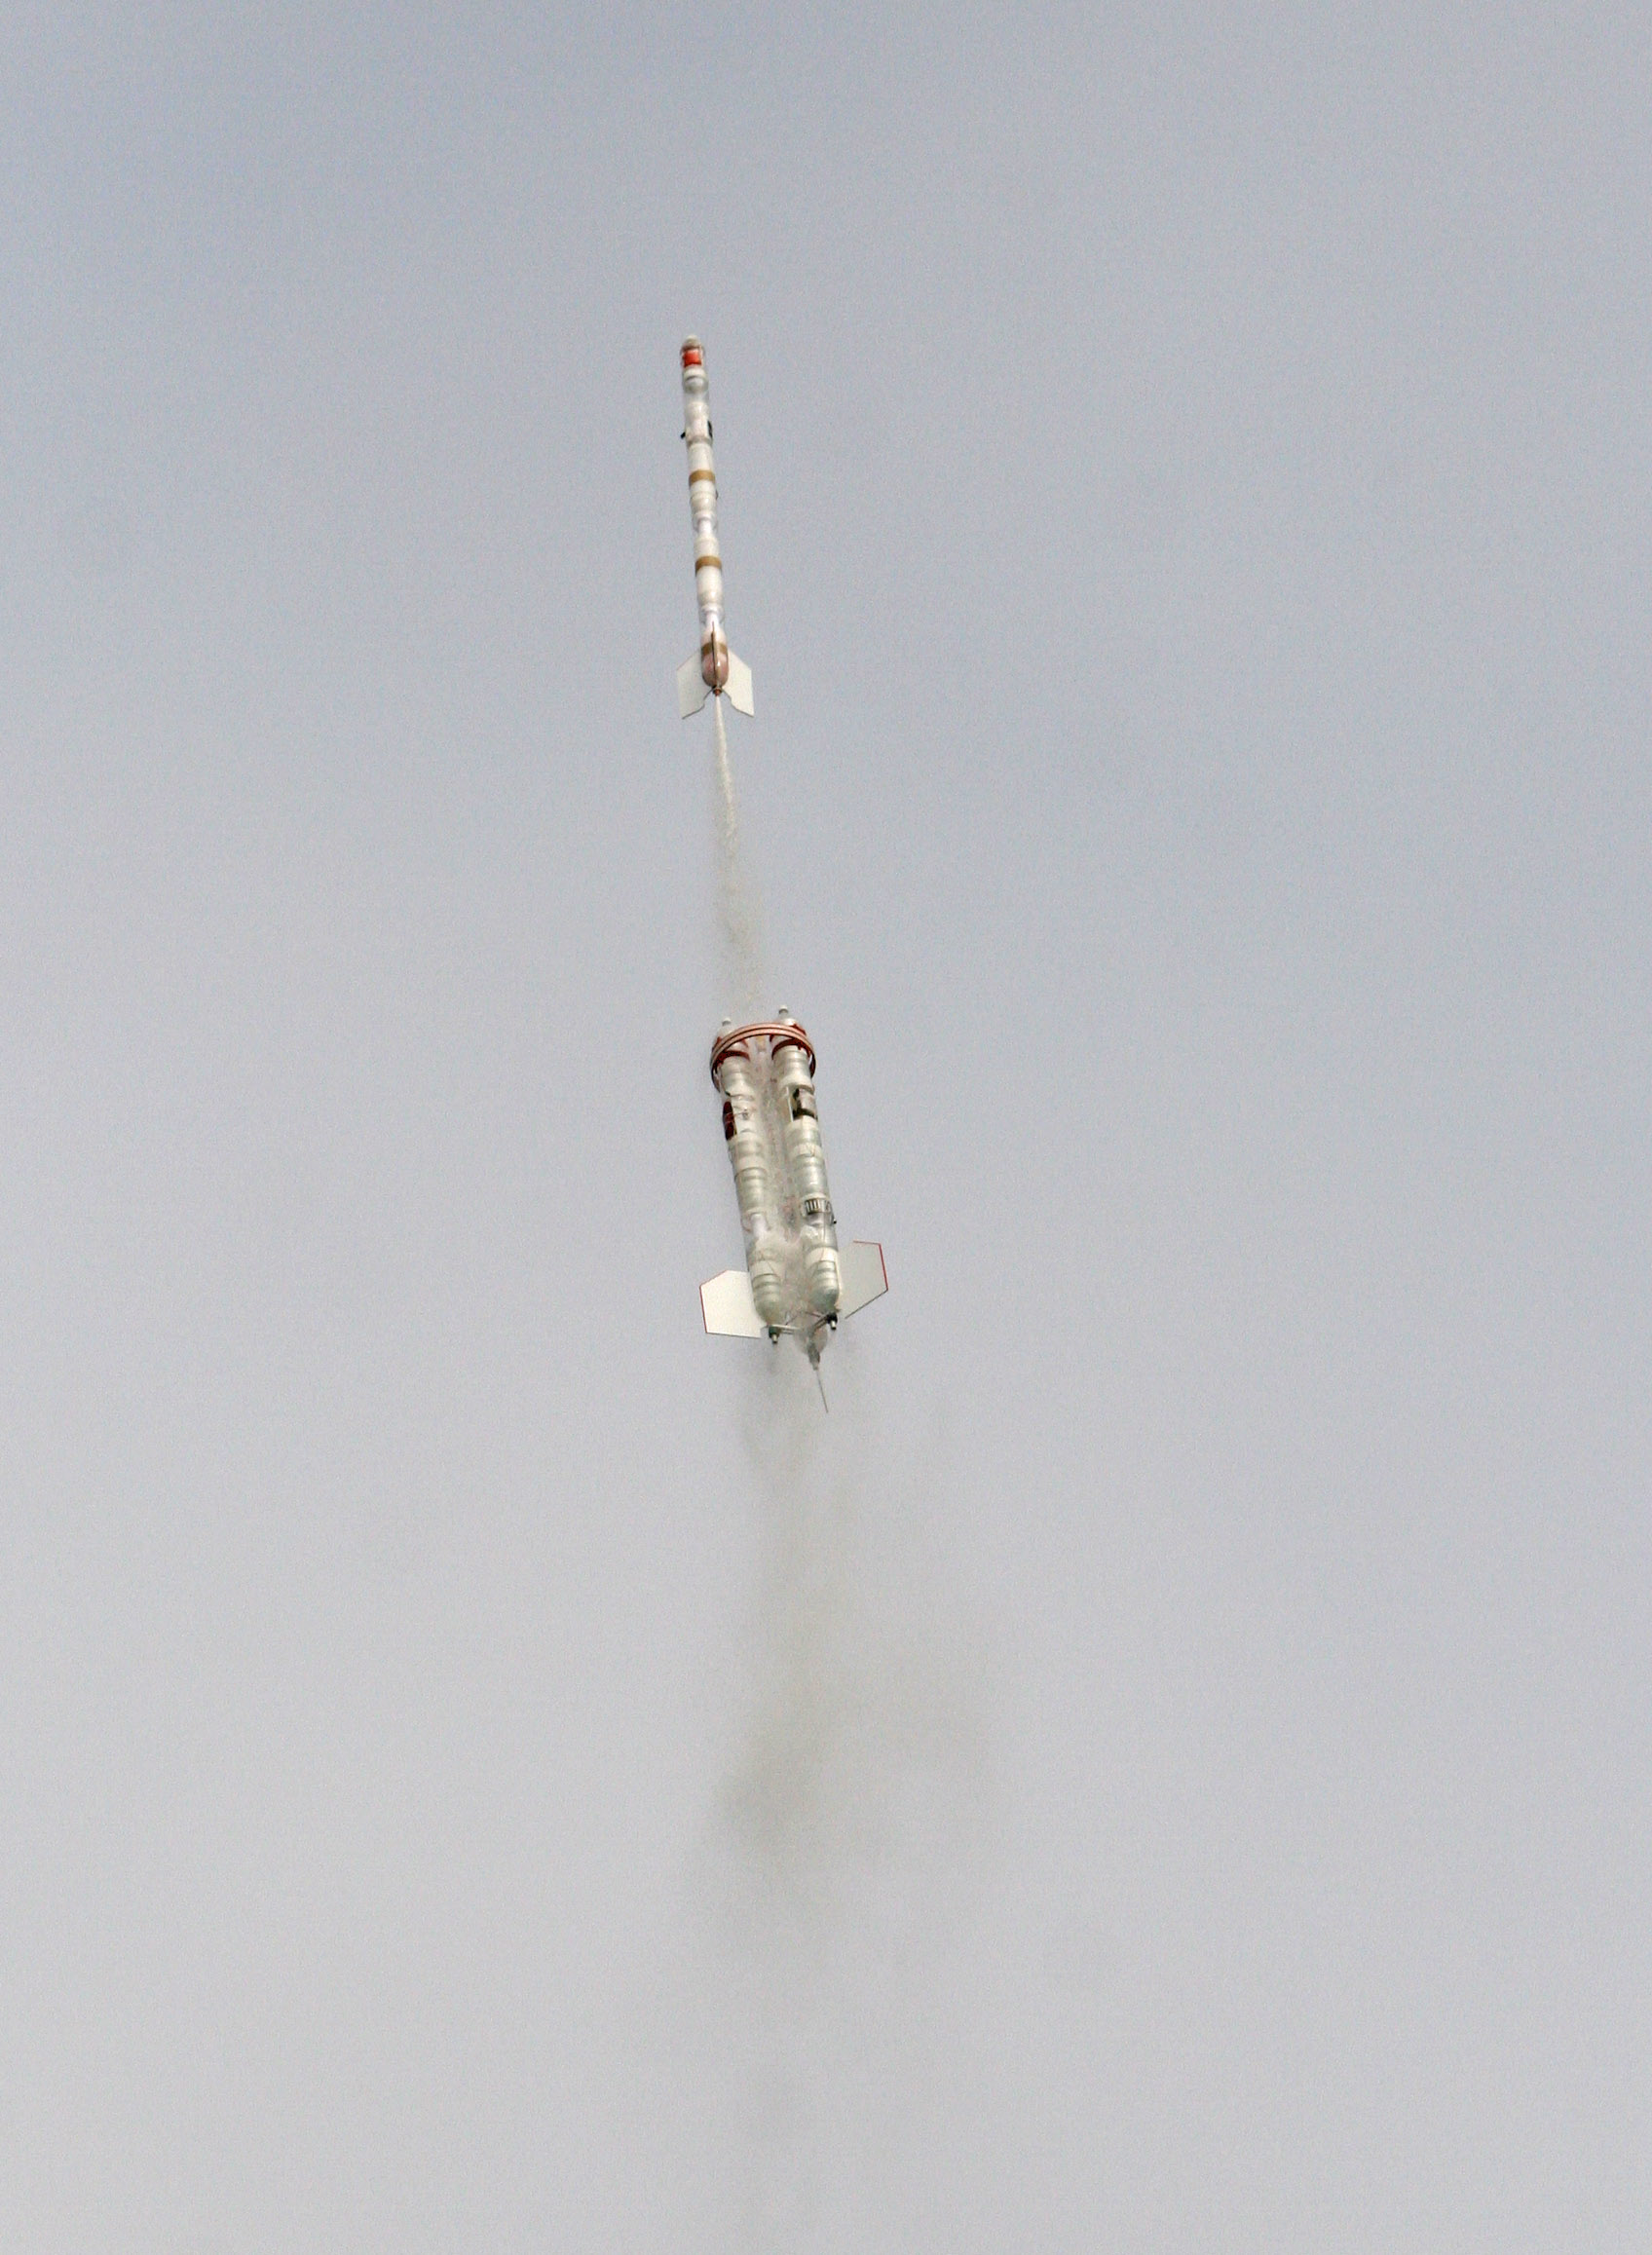
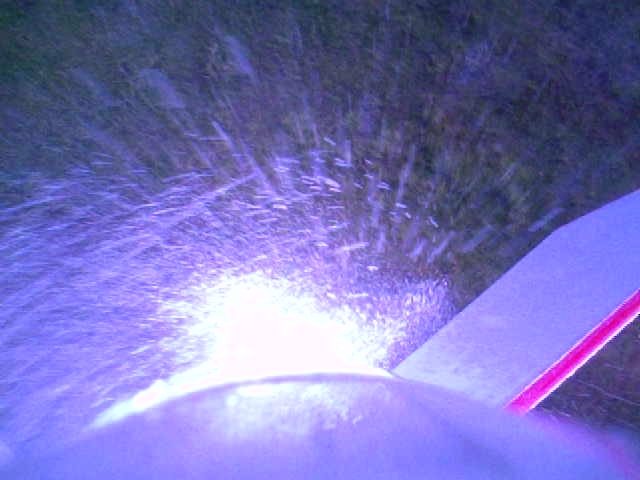
Staging occurs at 96'
Photo: A. Eltobaji
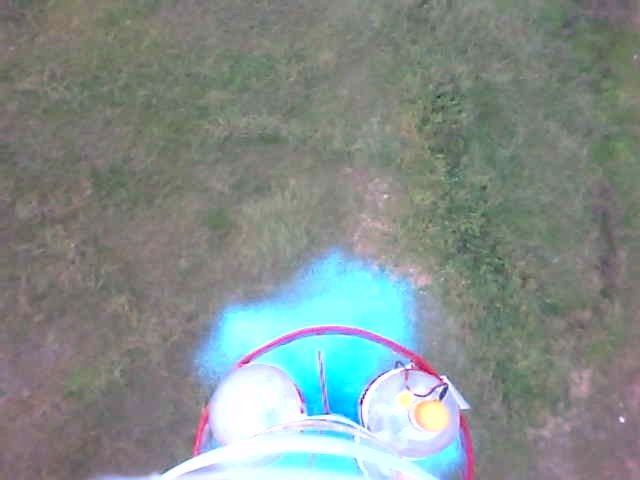
Booster view looking down shortly after
staging. The spray is from the sustainer.
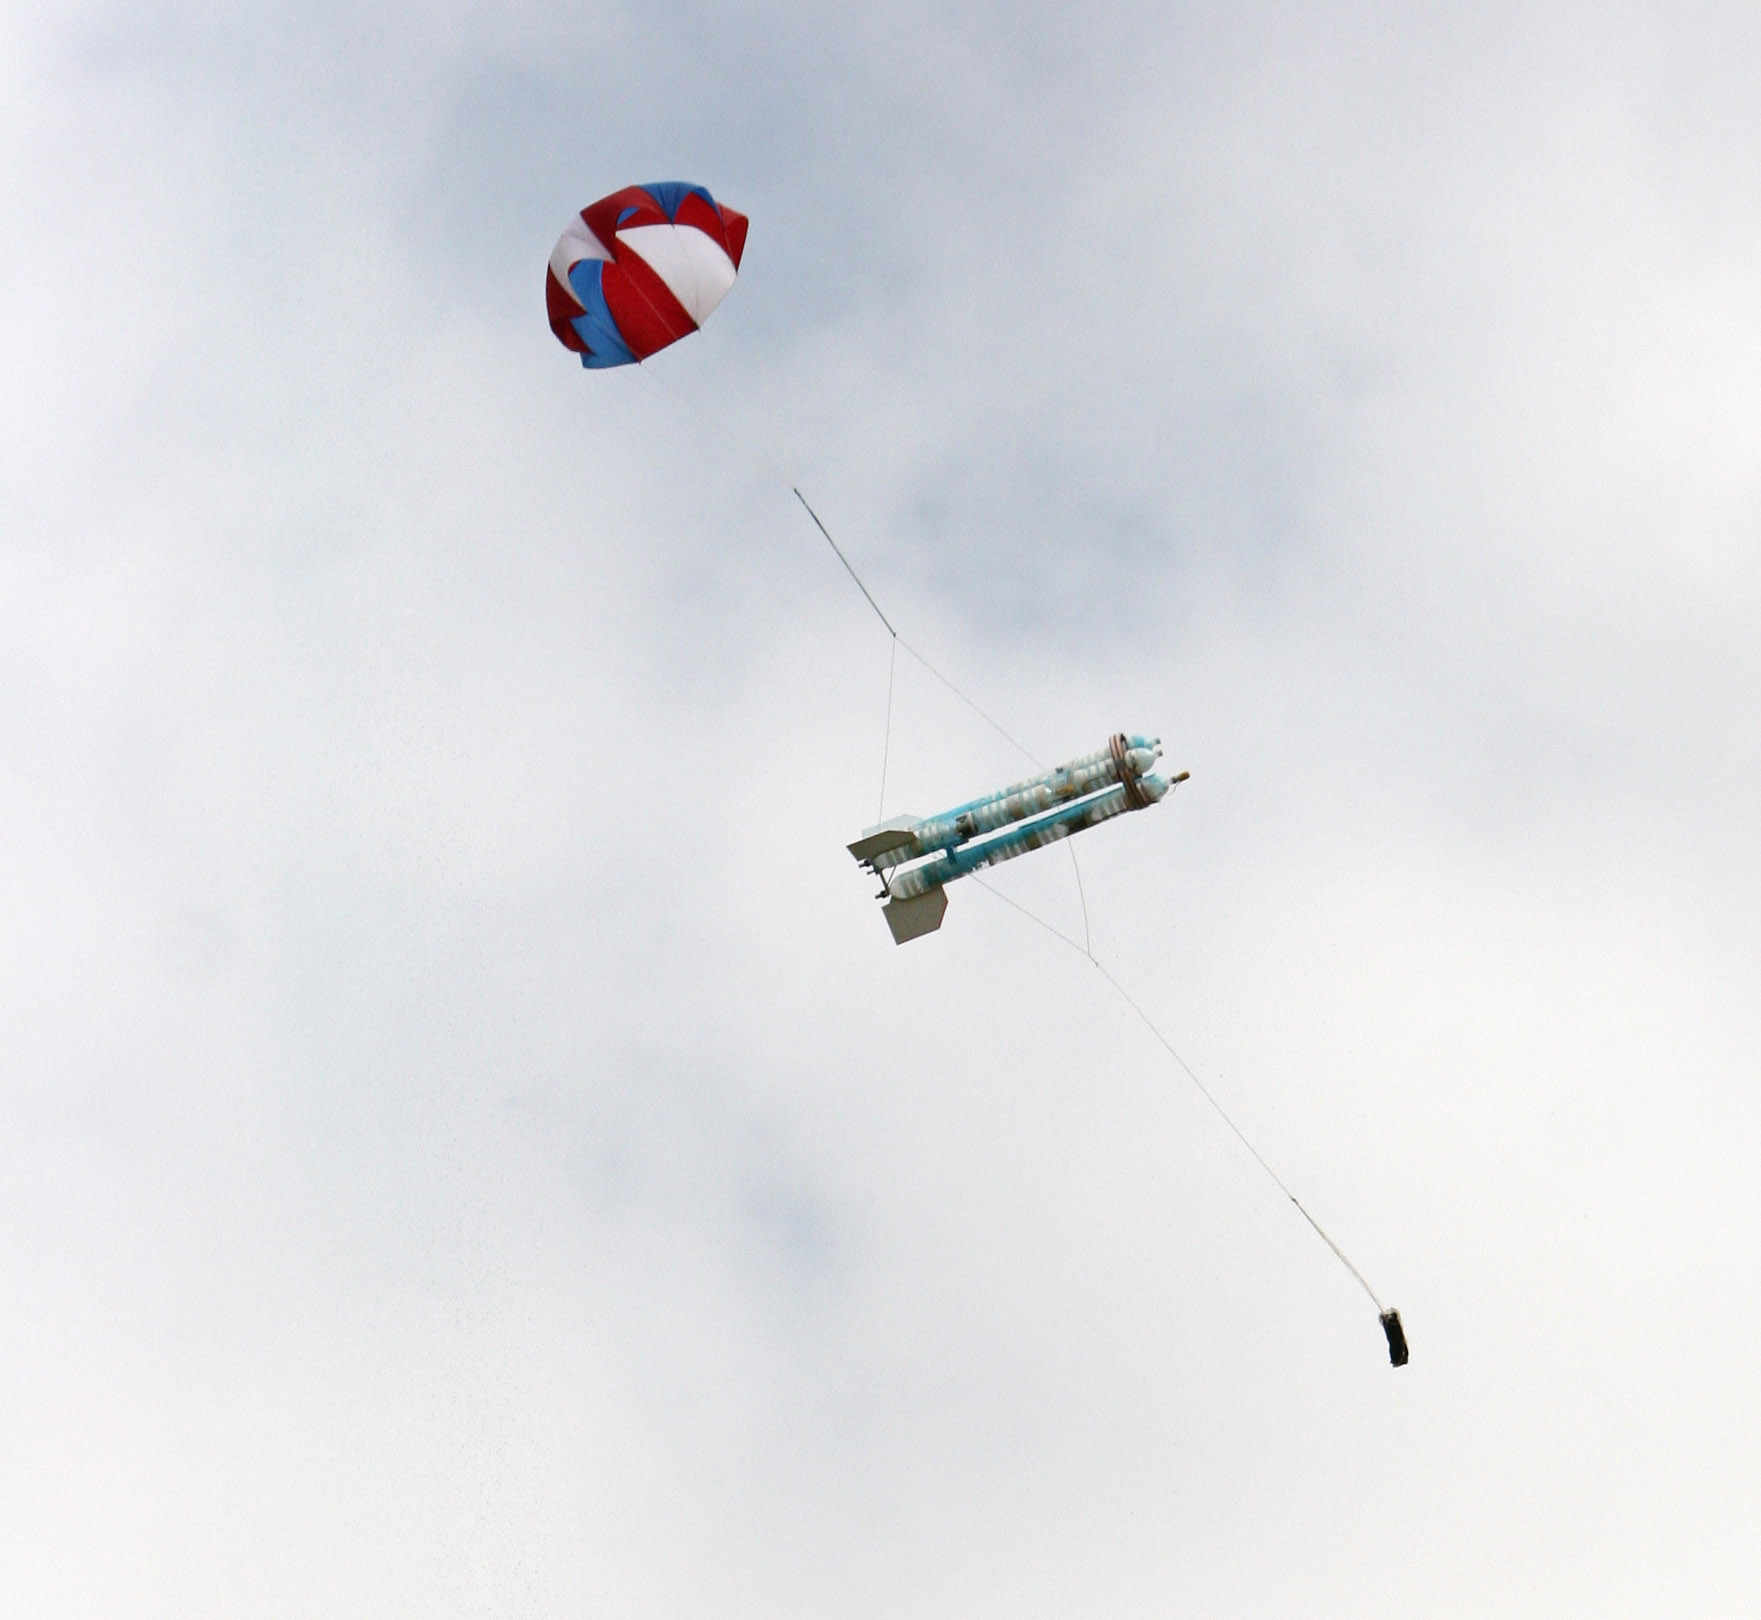
Booster just after apogee. The main
parachute is not yet fully open.
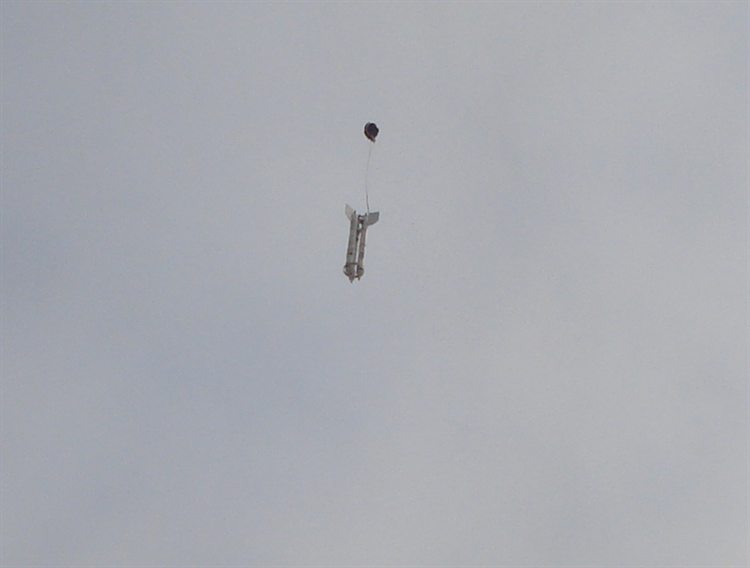
Sustainer approaching apogee. The day was
quite hazy and overcast.
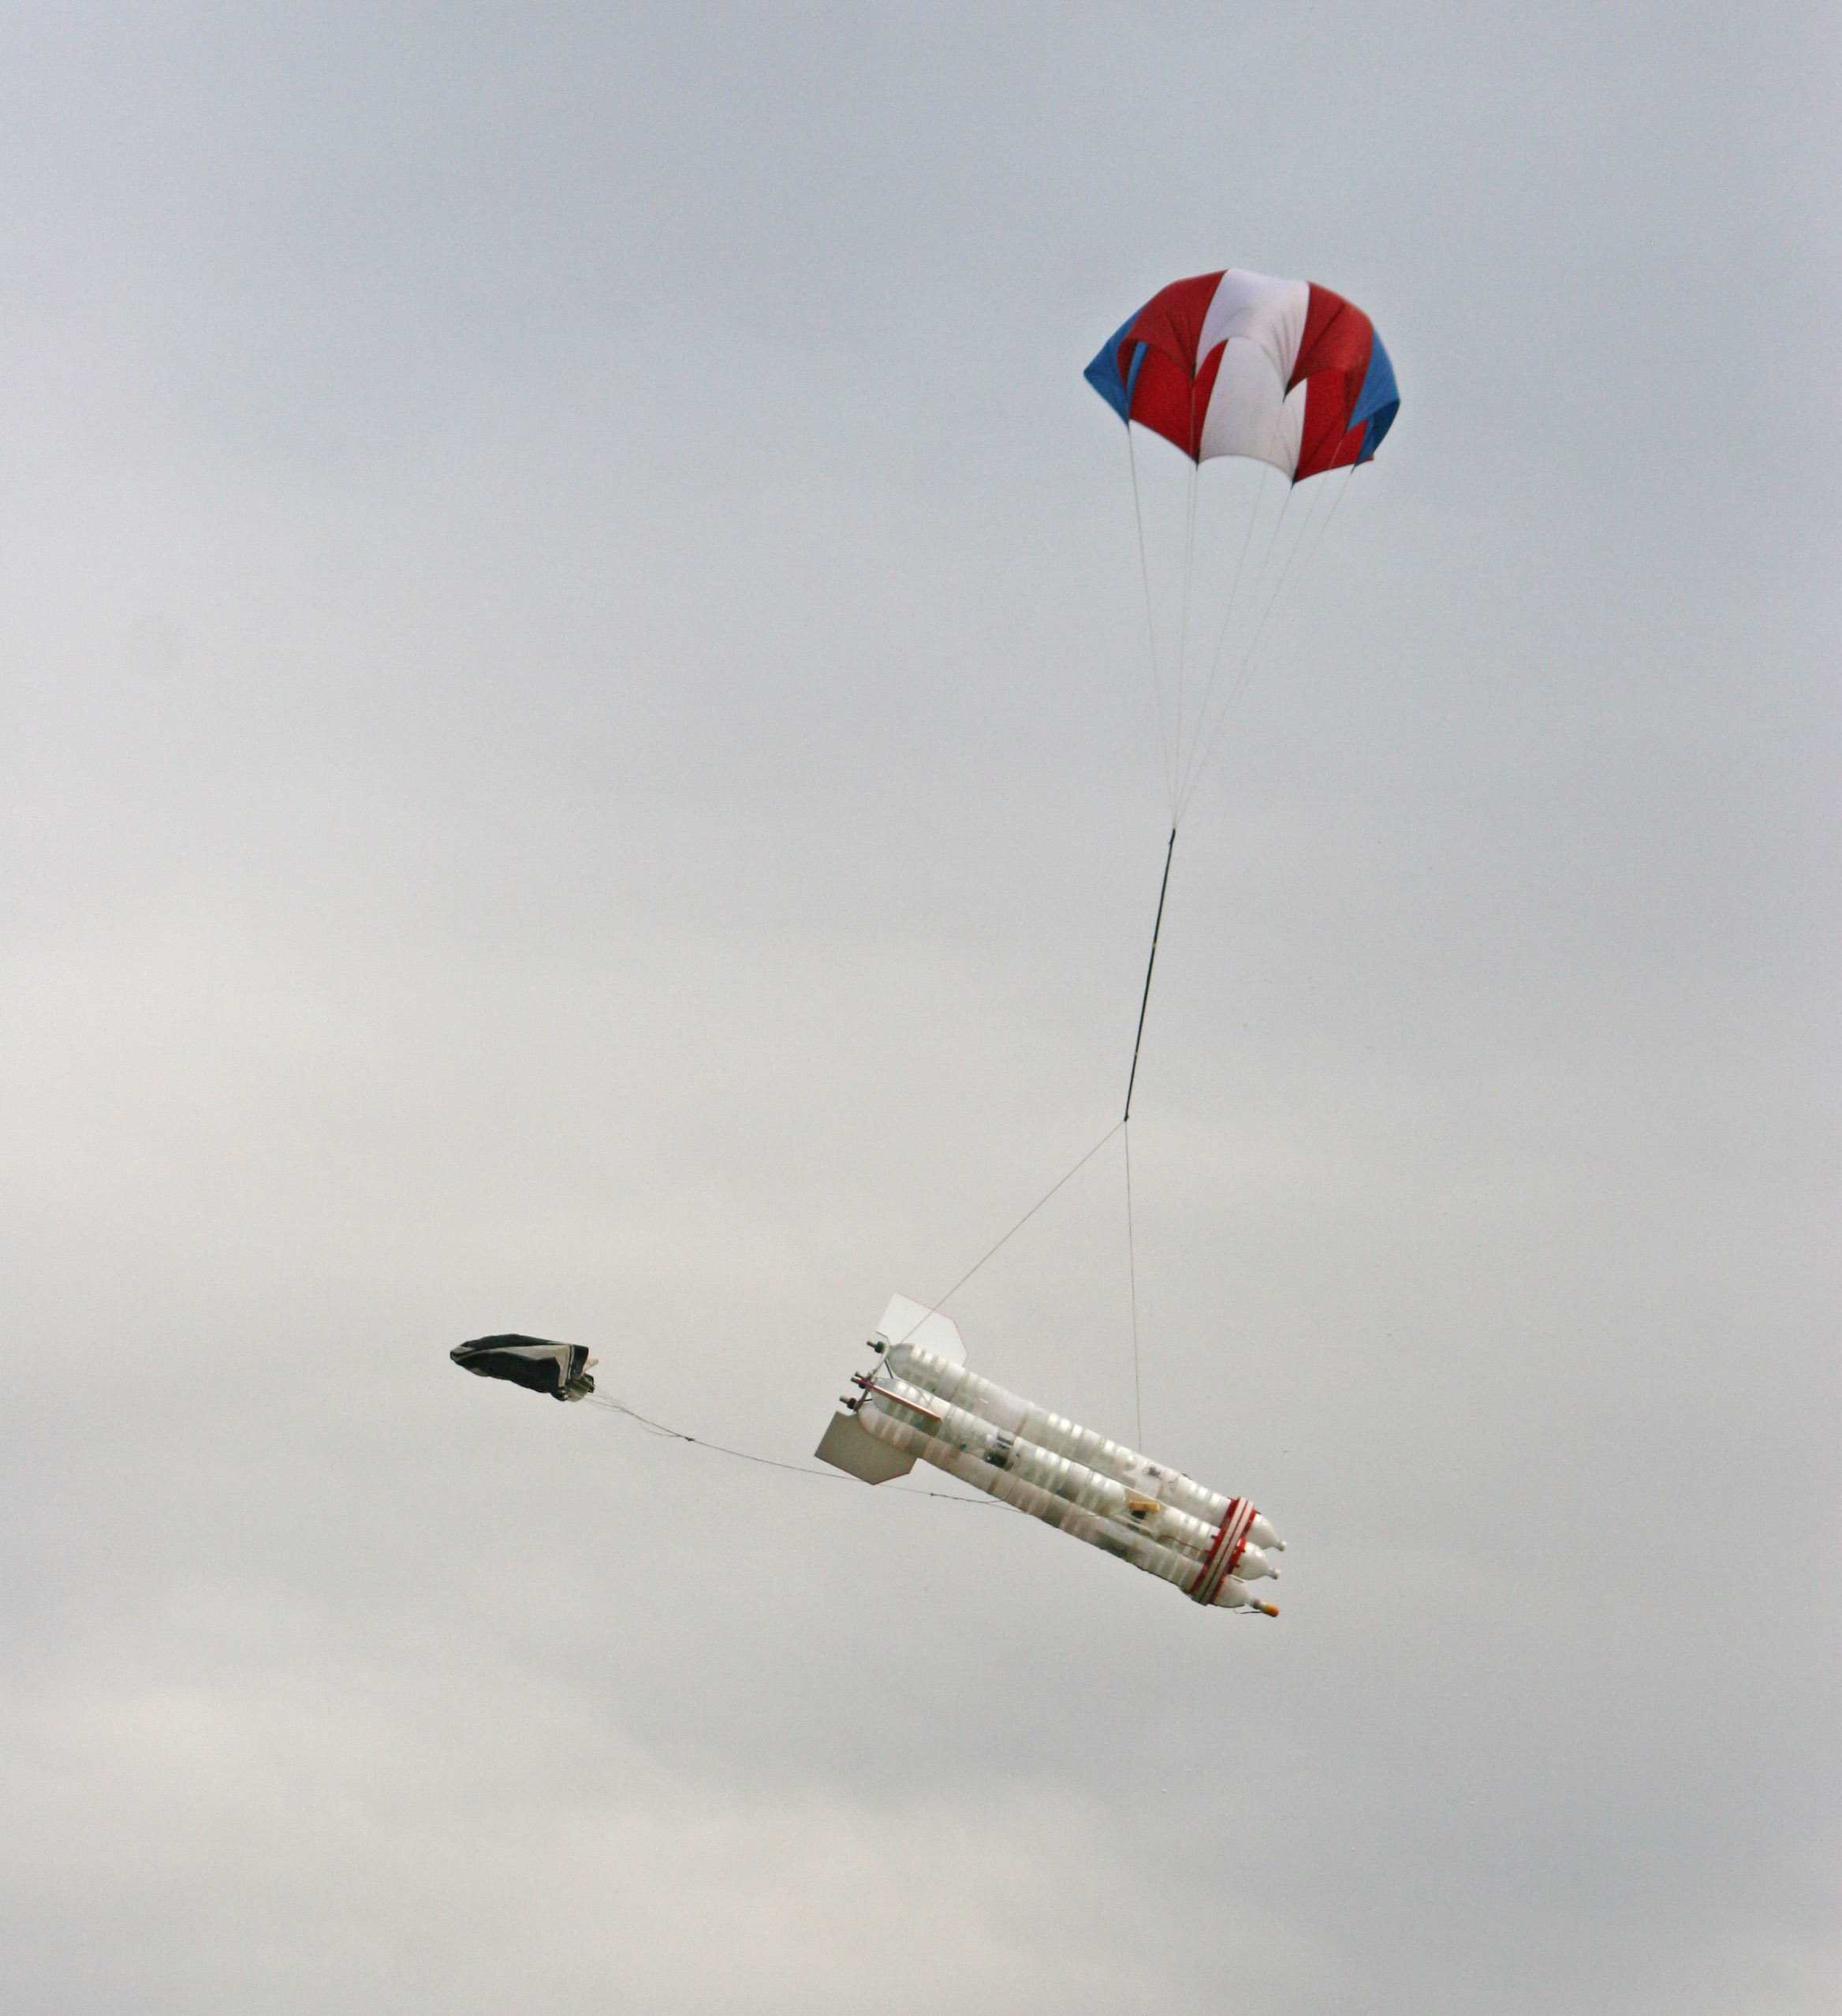
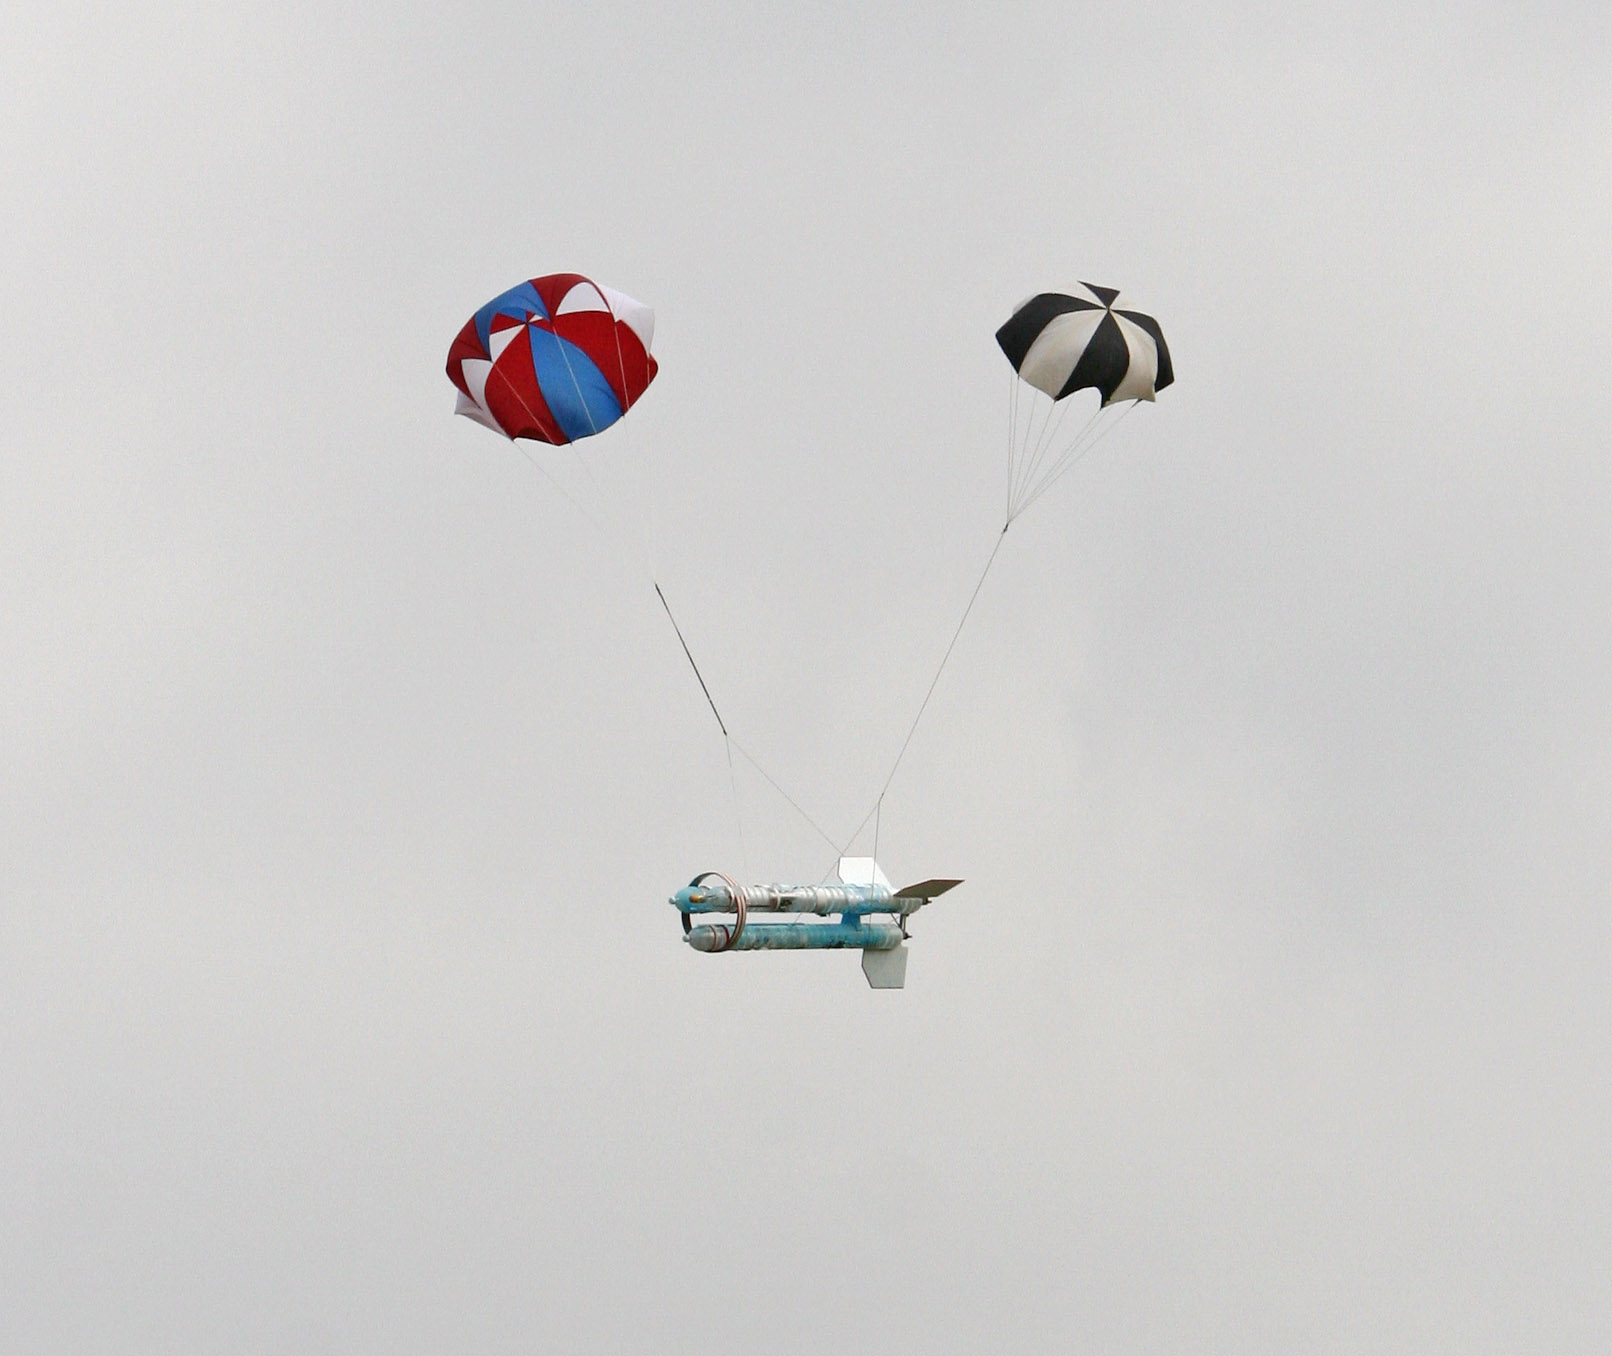
With primary parachute fully inflated, the
secondary is being deployed.
Photo: A. Eltobaji
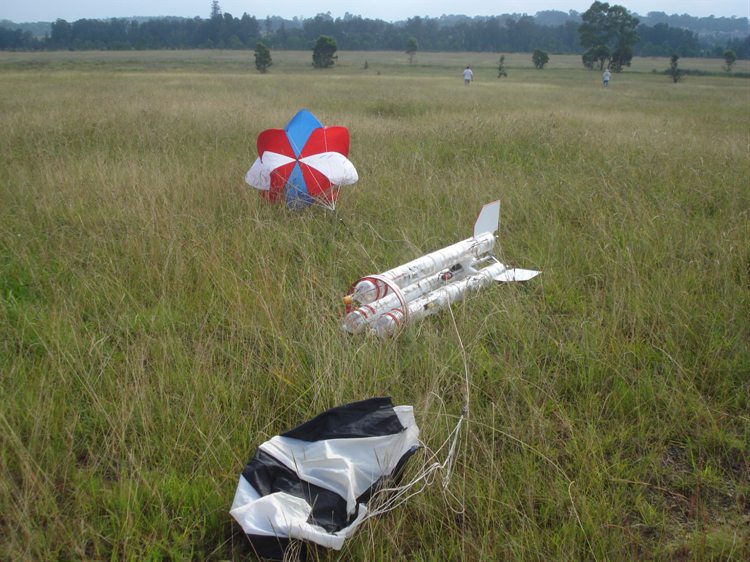
Two parachutes bring the booster down to a
soft landing.
Photo: A.
Eltobaji
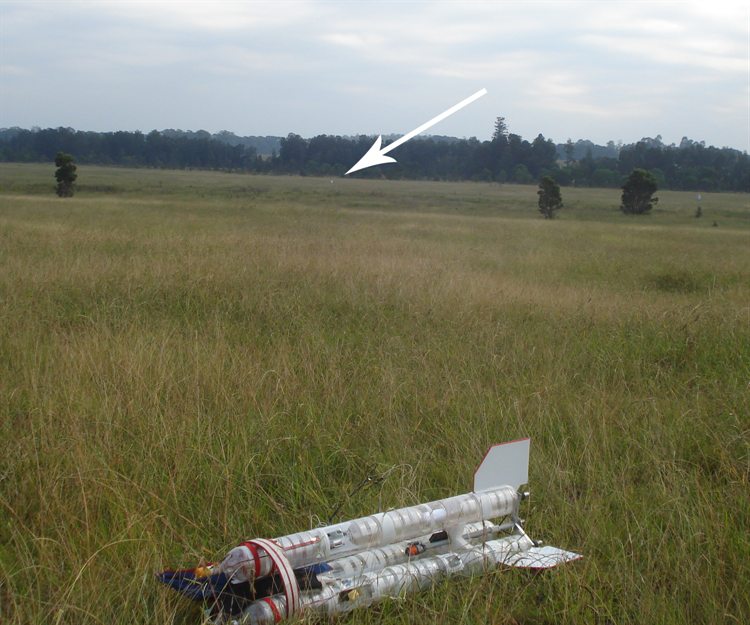
The booster is easy to find in the grass.
The sustainer is some 350m away and not so
easy to find.
Resting comfortably on the soft grass. The
grass always helps to cushion landings.
For the second flight we added blue food
colouring to the sustainer so that we could see
the trail against the white clouds.
Prepping the FlyCamOne camera. It had power
issues again on the second flight.
One of the nozzle seats had cracked in a
solder joint the night before. It was loose but
did not affect launch. Here it is pushed to one
side after launch.
The water columns all had nice laminar flow.
Photo: A. Eltobaji
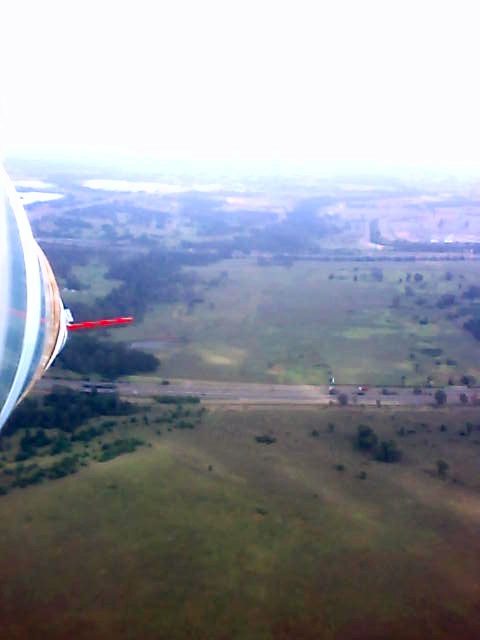
It looks like the red booster is a little
late to reach it's air pulse phase.
Photo: A. Eltobaji
Just after staging. The blue foam is clearly
visible.
A sequence showing rocket staging. Click to
see full detail.
Photo: A.
Eltobaji
The blue food colouring gets onto
everything.
Photo: A. Eltobaji
Both the primary and backup systems worked.
Photo: A. Eltobaji
Just prior to booster landing. I'm still
filming the sustainer.
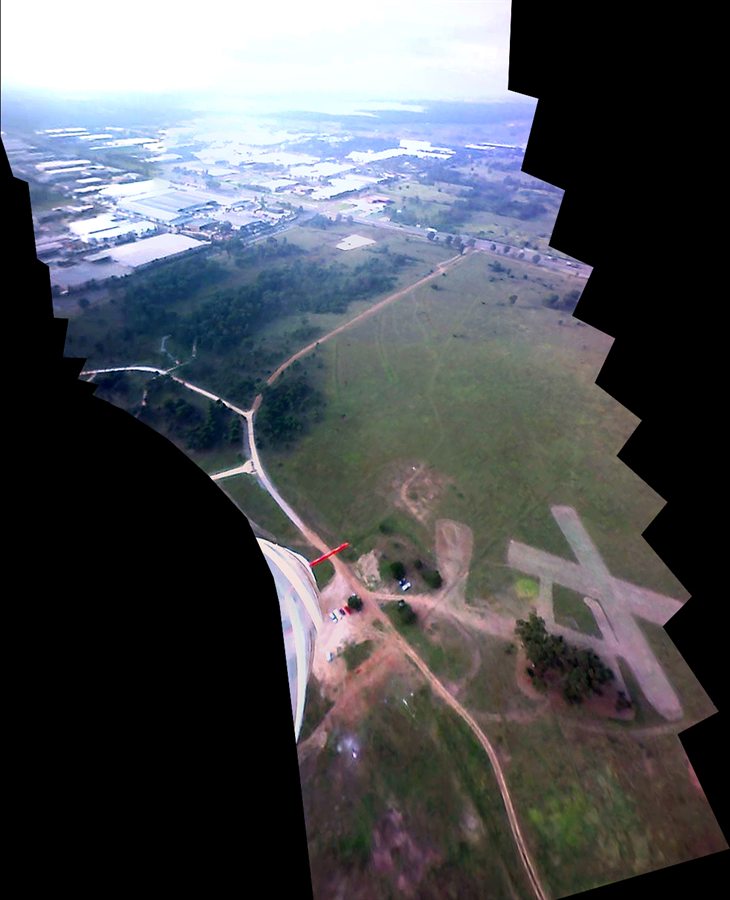
A nice view from up here. You can see
Prospect Reservoir on the horizon.
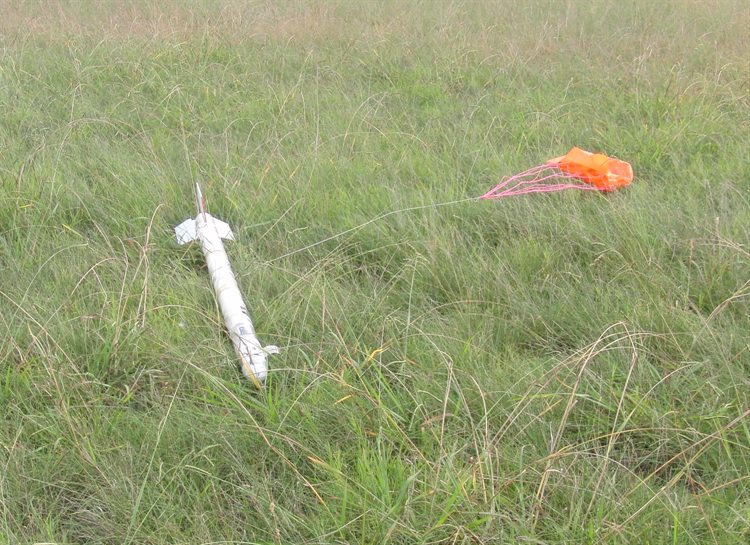
Sustainer coming down from it's high
altitude sight seeing tour.
Photo: A. Eltobaji
You can see how the blue gets onto
everything.
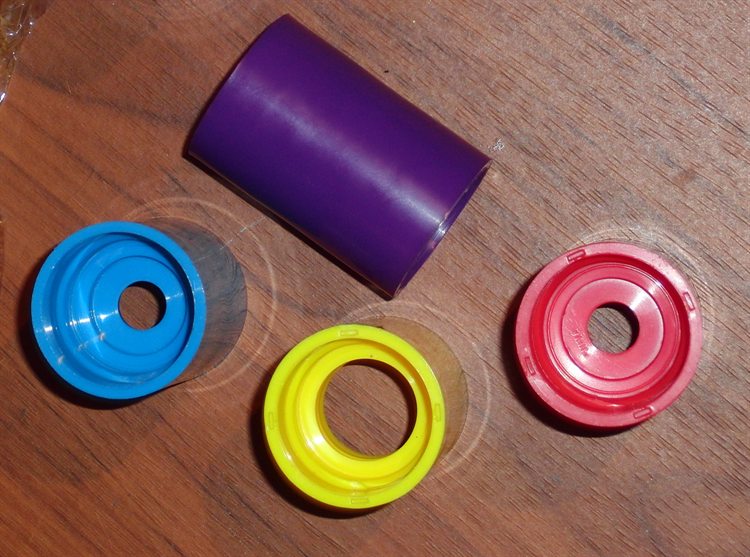
Tornado tubes as they arrived.
They have a 9.5mm hole, which was widened to
18mm (yellow) on the lathe.
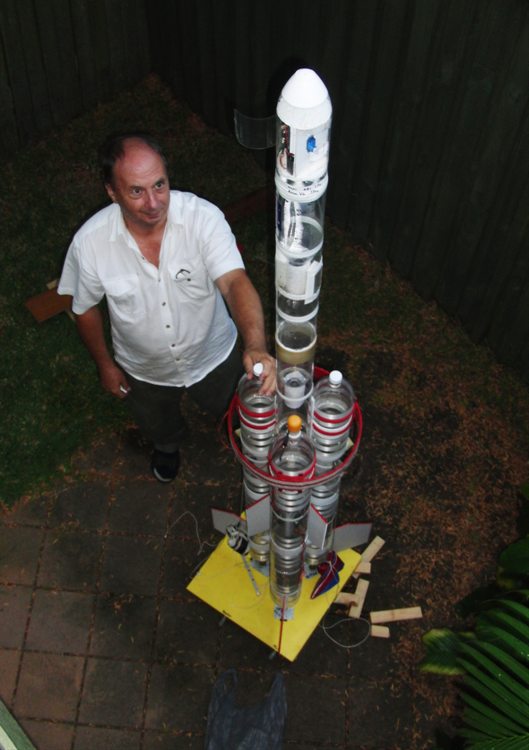
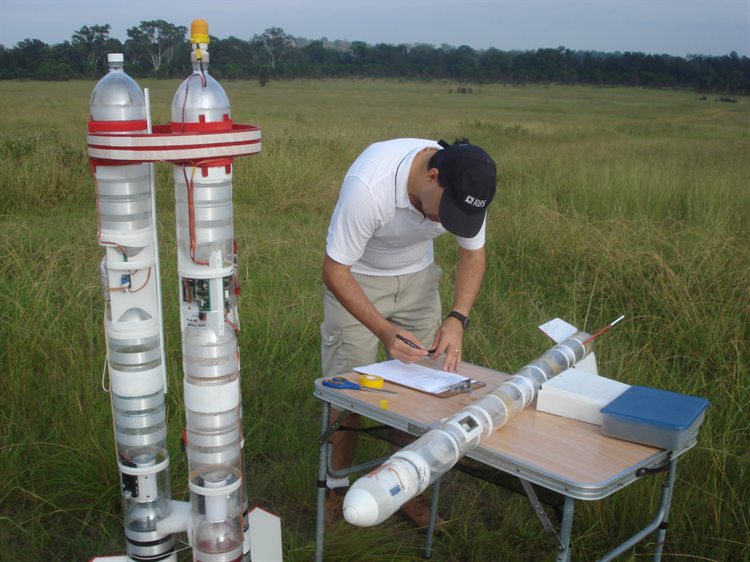
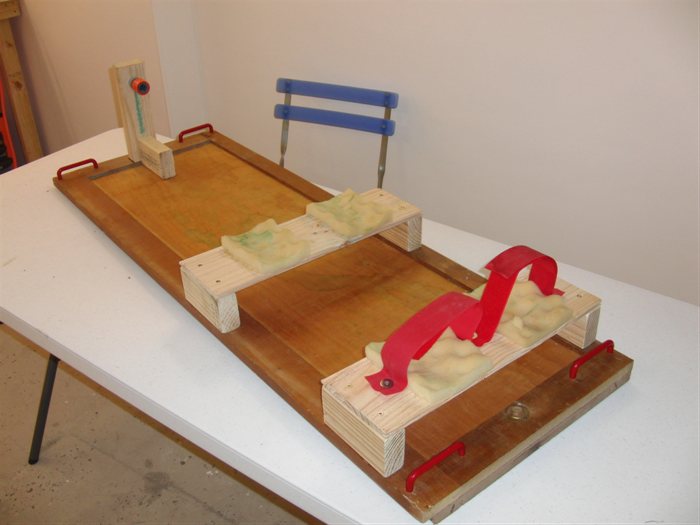
Acceleron V cradle for transporting the
booster.
Date:27th
March 2010
Location:Doonside, NSW, Australia
Conditions:Warm 28C, mostly cloudy
10+km/h wind.
Team Members at Event:PK,
GK, and
John K
Launch Day Report
We arrived at the launch
site around 8am as usual and started
setting up. It was overcast and there
was a bit of a breeze going, but at
least it was blowing in the right
direction. Although not ideal
the conditions were within acceptable
limits. We need to pay particular
attention to wind conditions because
this rocket is big and can catch the
wind easily. Without a launch rail
things could get interesting in a strong
cross breeze. It took about an hour to
set up the rocket for the first launch.
It's always good to have a checklist for
this procedure, as there are things that
need to be done in specific order.
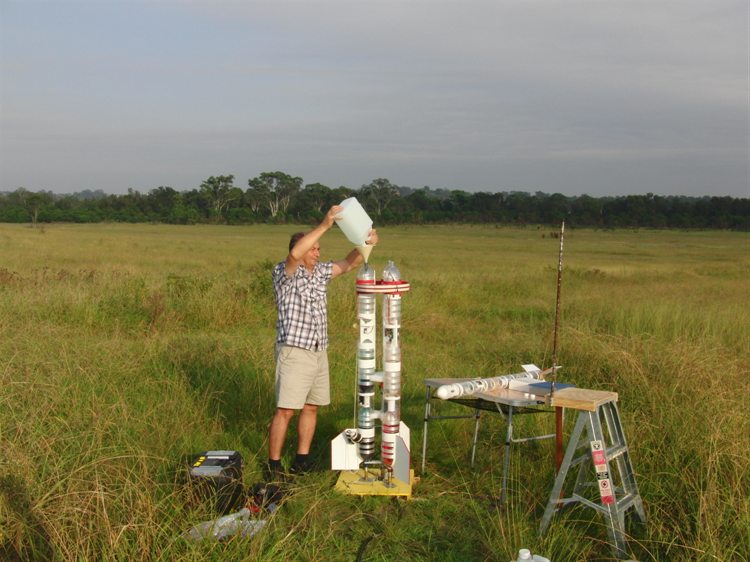
We pressurised both
the booster and sustainer to 120psi
for the first flight which is
slightly on the conservative side.
The launcher release head was a bit
sticky and John had to put his back
into it to get it to finally launch.
It's good to have the kids grow with
the rockets.
The rocket went up
almost vertically and separation was
nice and clean. The water flow was
laminar from all three nozzles
during the boost phase meaning the
new narrow nozzle seals were doing
their job. The air-pulse was also
simultaneous indicating that
pressure was pretty equal within the
booster segments. The booster
cruised for a little while before
staging. Reviewing the video, it
showed staging at 1.24 seconds after
launch which means the pressure
switch triggered the separation as
designed when there was little to no
thrust from the booster. The back up
staging timer was set at 1.8 seconds
from launch.
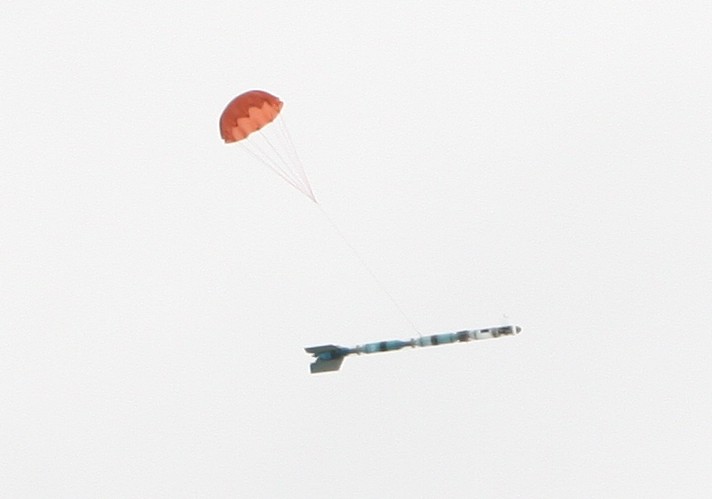
After separation the
booster continued it's upward track
for a little longer and deployed
it's primary parachute soon after
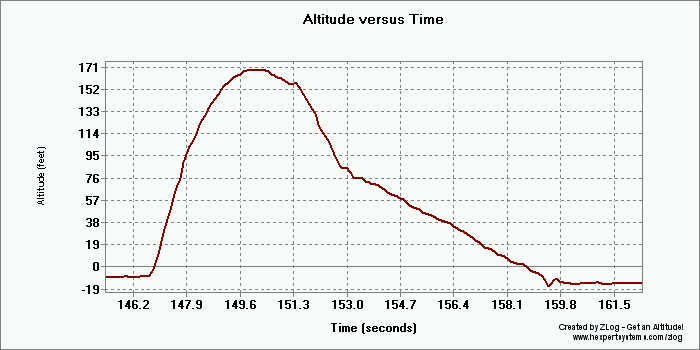
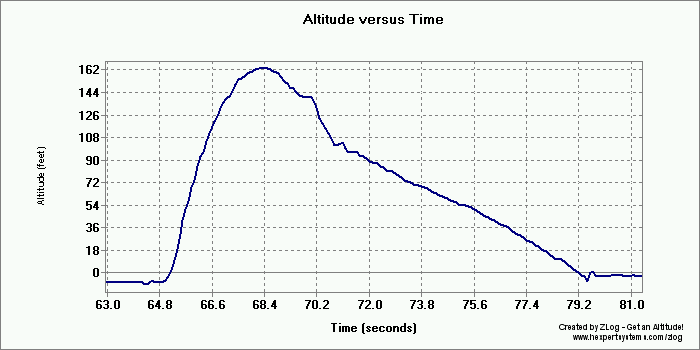
apogee. The booster reached 168'
(51m). The secondary/backup
parachute was also ejected well
above the ground but because the
rocket was slowed by the primary
parachute, it took a while before it
too fully inflated.
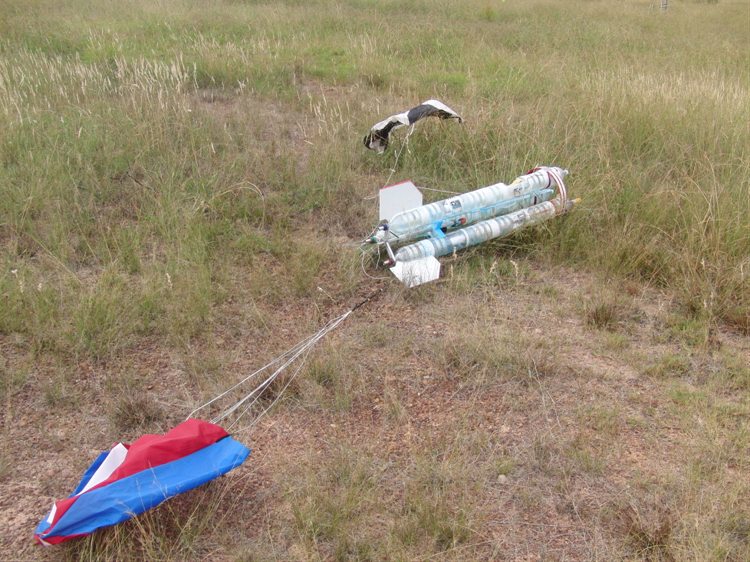
The booster landed
well on its side, but suffered a
little bit of damage on the balsa/fiberglass
ring brace. 3 out of the 6 birch
wood attachment tabs had broken.
This wasn't a critical problem as
the other tabs were enough to hold
the brace in place for the next
flight. We added extra gaffer tape
over the brace to make sure it
stayed attached to the booster
segments.
The sustainer
powered its way upward although it
had a little bit of spin on it. We
noticed this spin in last weeks
qualifying flights, but did not try
to fix it. The spin is useful for
overcoming any off-axis thrust from
the nozzle or if the rocket is not
axially balanced. Although the spin
is not ideal for onboard video, I
think in the end it helped to make
sure the rocket continued upwards
rather than in an arc.
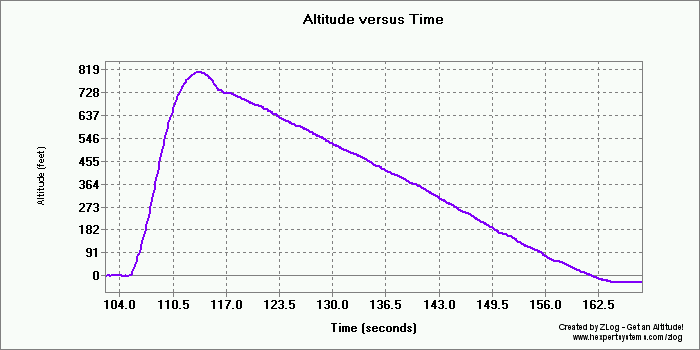
The rocket reached
787' (239m) which was a new personal
record for us. We were hoping to get
over the 200m mark with these
flights.
The parachute opened
just after apogee which was good, as
I didn't want it to open too early.
It is hard to simulate a flight with
foam accurately.
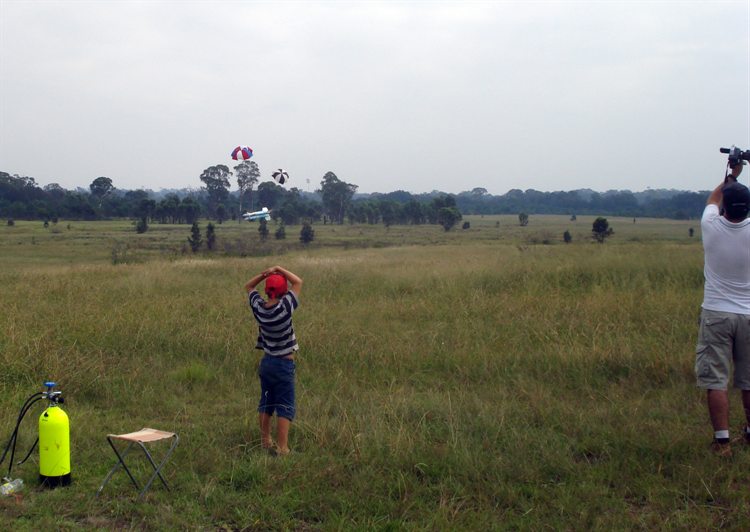
The cross breeze
ensured we had a nice walk of about
350m downrange to retrieve the
sustainer. The booster luckily
landed within several dozen meters
of the launch pad.
The onboard video
turned out quite good, but when it's
cloudy the colours are a little
washed out, and the auto iris also
tends to misbehave a little. The
horizon was quite hazy, but it was
the first time we were able to see
the shore of Prospect reservoir
quite clearly. The booster camera
also had a good view of the take off
and spray from the staging.
This was also our
longest flying water rocket at 60.5
seconds to date.
Here is a timeline
of events from flight #1:
Flight #1 Timeline
Time (s)
Event
T - 0
Launch
T+ 0.2
Launcher fill tubes exit
nozzles
T+ 0.52
Start of air-pulse
T+ 1.24
Staging @ 96' (29m)
T+ 3.4
Booster apogee @ 168'
(51m)
T+ 6.2
Booster main parachute
fully inflated @84' (25.5m)
Including the
repairs, it took about 20 minutes to
set the rocket up again. Although we
waited about an hour between
launches as we downloaded the
altimeter and camera data first in
case we lost the rocket and would be
unable to recover the data from
flight 1.
Because of the white
clouds, dad suggested we colour the
foam a dark blue so that the trail
could be seen against the clouds. I
protested because of the mess it
usually makes and for some reason
the blue in particular tends to
stain most things permanently.
Although everything on the booster
ended up with a blue tinge, in the
end it really made a big difference
to the visibility of the foam trail.
This chick still has lots to learn
from mother hen. :)
We again pressurised
the booster and sustainer to 120psi
and launched. This time the release
head released the rocket easily.
This flight was
almost identical to the first in
terms of flight and performance and
timing of events.
The sustainer again
had a bit of a spin but the staging
plume looked nice and blue in the
on-board video.
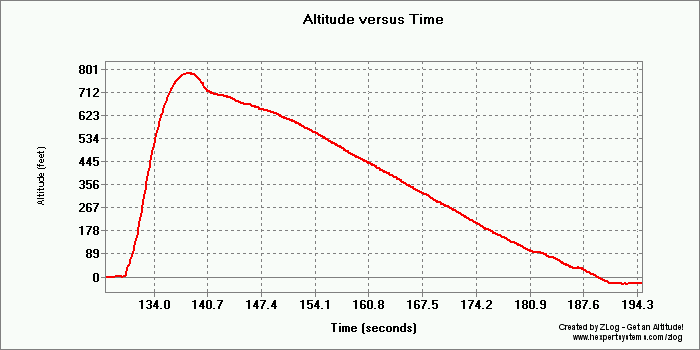
The booster reached
163' (49.5m)
The sustainer
reached 810' (246m)! This helped
confirm that the original flight was
reproducible with this setup and
pressure. Our personal previous
altitude record was 637' (194m)
flown with the Polaron VI
rocket
almost 2 years ago.
The sustainer again
drifted a long way down range. When
I went to retrieve it I ended up in
the wrong place and spent at least
20 minutes looking for it in the
tall grass. I even tried climbing a
tree to get a higher view. I was trying to listen
for the lost alarm on the flight
computer, but it was impossible to
hear with all the crickets chirping
in the grass. I need to make it
louder.
The FlyCamOne in the
booster had stopped recording early
again (before launch), exhibiting
the power issues it had last year.
The camera had an external
power source (4 x AAA NiMh batteries)
on this flight, but obviously it
wasn't working properly. I have
ordered a couple of new higher
capacity LiPo batteries for the
FlyCams hoping that this problem
goes away, but they are still on
back order so I hope to get them
sometime middle of next month.
We didn't have any
issues with the altimeters like we
did with one of them last week. The
reset seems to have worked.
The night before
launch day we discovered that one of
the launcher's nozzle seats had a
crack all the way around in the
solder where it attaches to the
base. This made the whole nozzle
seat wobbly. Because of the forces
involved in that section, the crack
was not considered to be critical
and could be fixed after the launch
day. On both flights the fill tube
and nozzle seat ended up being
pushed to one side, but had no
effect on the launch itself. See
photo on left.
Together at launch the
booster and sustainer carried the
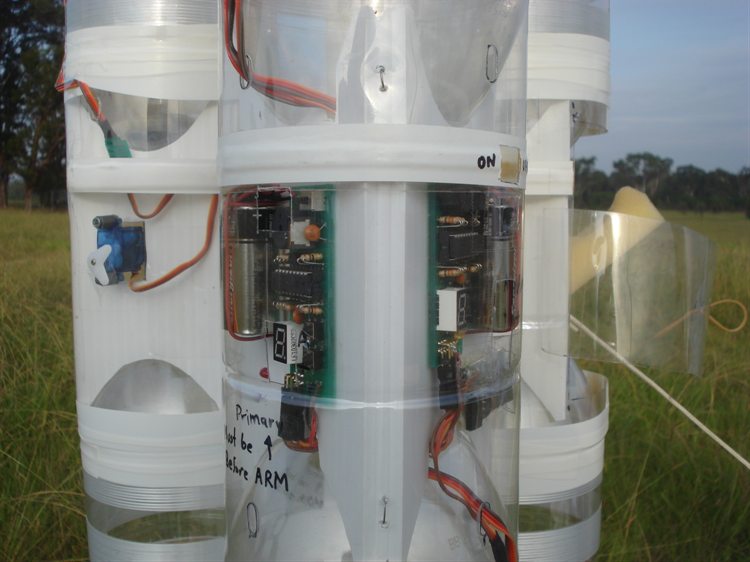
following:
3 x parachutes
5 x RC servo motors
2 x Z-log altimeters
3 x FC 1.6 flight
computers
1 x MD-80 camera
1 x FlyCamOne 2
camera + power pack
1 x Gardena staging
mechanism
We were very happy to
finally get these two flights under our
belt as it's been almost a year since we
started designing this particular
rocket. We have learned new construction
techniques along the way so it's been a
worthwhile exercise. We now know that
this particular cluster/2-stage
arrangement works well, and we hope to
use it a few more times in the near
future. It's also good to know that you can
reach good altitudes at regular type
pressures. The new splicing technique
worked well on the 2L bottles, as did
the new pressure switch.
Thanks also goes to
Darren from
Suburban Rocketry for
helping to film the booster in flight.
What's next for
Acceleron V?
There is good potential
for further improvement in the Acceleron
V design. We are considering a
number of options for flying it again:
Shorter term:
Increase the launch
pressure to 130psi either for both
sustainer and booster, or sustainer
only.
Reduce the weight of
the sustainer by using smaller fins,
replacing the 9V battery with small
LiPo cells, replacing MD-80 with
MD80 clone. These measures should
reduce the weight by around 100
grams (~15%).
Reduce the spin on
the rocket.
Add dual parachute
deployment to the sustainer to limit
drift.
Extend each of the
booster segments by another spliced
pair of bottles.
Extend the sustainer
by another spliced pair of bottles.
Longer term:
Reinforce the
sustainer and launch it at higher
pressures - 160psi+.
Eliminate some
tornado couplings and make longer
spliced sections to gain more volume
in the same length.
Full booster segment
length launch tubes on the launcher.
Here is a highlights
video from the day:
Flight computer
settings:
V1.6
V1.6
V1.6
Primary
Secondary
Sustainer
0.
0
0.
0
0.
0
1.
0
1.
1
1.
8
2.
1
0.1 secs
2.
8
1.8 secs
2.
2
8.2 secs
3.
0
3.
0
3.
0
4.
0
4.
0
4.
0
5.
1
0.1 secs
5.
1
0.1 secs
5.
1
0.1 sec
6.
0
6.
0
6.
0
7.
V
7.
R
7.
V
8.
7
1.12 secs
8.
7
1.12 secs
8.
F
2.4 secs
9.
U
9.
V
9.
0
A.
0
A.
0
A.
V
B.
F
2.4 secs
B.
F
2.4 secs
B.
F
2.4 secs
C.
0
sound OFF
C.
0
sound OFF
C.
2
Sound ON
D.
0
D.
0
D.
4
E.
0
E.
0
E.
5
Miscellaneous
Charging LiPo batteries
While researching
chargers for the little LiPo batteries,
I found out that USB powered chargers
typically deliver 100mA for the charge
current. While LiPo batteries should be
charged at 1C, I figured a 70mA battery
could still be charged at 1.3C. The spec
says maximum charge current for these is
2C. SparkFun electronics has a simple
little 1 cell charger
http://www.sparkfun.com/commerce/product_info.php?products_id=726
which looked quite good
and affordable. I then realized that I
already had one of these chargers in the
form of the smashed FlyCamOne V2. The
camera could be plugged into the PC and
it seemed to work, but I could never get
it powered up by itself again. I had to
resolder one of the tiny SMD resistors
which had broken on impact as well.
After desoldering the old battery I
connected one of these little ones. And
to my surprise the FlyCamOne powered up
again and I was even able to record a
video using the little cell. WoooHooo...
the good news is I now have a working
camera again, but the bad news is that I
don't have a charger anymore. I'll now
buy a couple of new 350mAh cells for
both FlyCamOne cameras since they were
both a little under powered using their
built in cells.
One of the slightly
annoying things has always been
transporting the rockets in the car. You
want to keep them as straight as
possible during transport but have to
raise them up enough to not rest on
their fins. They can bounce around in
the car as well. They are basically just
awkward to pack. The Acceleron V rocket
is even worse so we decided to build a
dedicated cradle for it out of an old
cupboard door. It locks the rocket in
using an old Gardena quick connector and
is further tied down with Velcro straps.
This also makes it easy to work on the
rocket on the table. See photo on left
of the cradle.
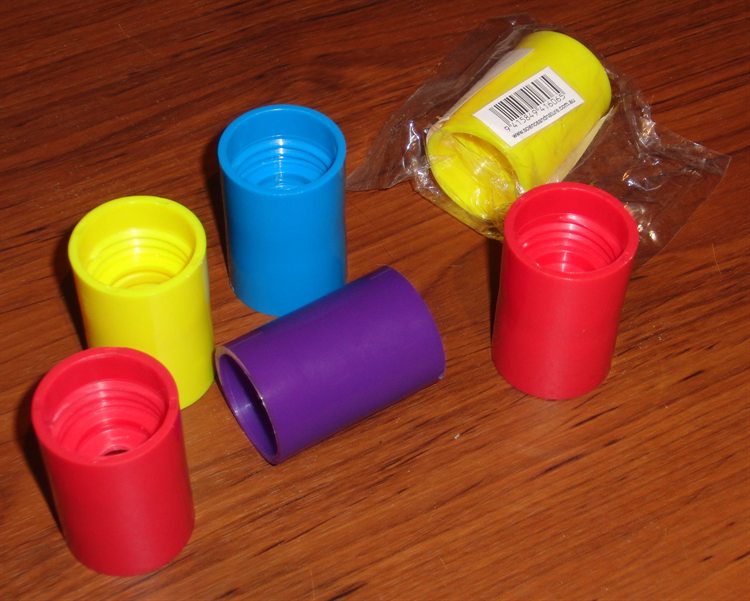
Tornado Tubes
We finally decided to
try out some commercial tornado tubes from
http://www.coolthings.com.au/vortex-valve-tornado-tube.html
to see how well they perform in rockets.
The tornado couplings we have been using
(re-threaded 3/4" BSP sockets) took
about 15 minutes to make each on the
lathe and cost about $4 in materials.
These tornado tubes are ready made and
only cost $2.50. These have been used
for a few years in water
rockets.
Here is one Mat G. used them on his water
rockets.
They have an internal
baffle with a 9.5mm hole which isn't too
bad, but you can easily widen the hole
to about 18mm. This can be done with a
round file or on the lathe. 18mm is
plenty for a 15mm launch tube to fit
through. The 9.5mm hole should be
suitable for jet foaming. They each
weigh 16 grams.
These tornado tubes are
not specifically designed for pressure,
and the plastic seems a little brittle.
We hydro tested one to 130psi during the
week to see how well it seals. There is
a very fine ridge internally to the
tubes that forms the seal when you
tighten it. The tornado tube we tested
held up well to the pressure without
leaks. We are not sure what the upper
pressure limit is for these tubes is yet.
If we get any leaks in
the future, it is possible to fit an
o-ring to the bottle to seal them up. We
need to test fly a rocket with a pair of
these couplings to see how they perform
under real world conditions.
Zlog Altimeter x 2,
FlycamOne2 x 1, MD-80 camera x 1
Altitude / Time
168' (51 m) Ac.,
787'
(239 m) Ax. /
12.6secs(Ac), 60.5secs(Ax)
Notes
Very good straight
flight. Sustainer had quite a bit of
spin. Good parachute deploys on both
sustainer and booster. Good
altimeter data and video from both.
Booster sustained minor damage to
ring brace.
V1.6 x 2 (Ac) and
V1.6 (Ax)
See settings above. Sustainer set to
8.9 seconds for deploy for this
flight.
Payload
Zlog Altimeter x 2,
FlycamOne2 x 1, MD-80 camera x 1
Altitude / Time
163' (49.5 m) Ac.,
810'
(246m) Ax. /
14.3secs(Ac), 58.7secs(Ax)
Notes
Very good straight
flight. Our highest altitude to
date. Sustainer had quite a bit of
spin. Good parachute deploys on both
sustainer and booster. Good
altimeter data and video. Booster
camera failed (power issues) prior
to takeoff.